Set Up an Azure AD SAML Application
Ensure that you have Administrator access to your Azure Account and Privacera.
Perform the following steps to create and configure an Azure AD SAML Application for Single Sign-On (SSO):
Step 1: Log in to Your Azure Console
- Log in using your administrator credentials.
Step 2: Create a New Application
- In the Admin Console, go to Enterprise Applications.
- Click New Application.
- Search for Microsoft Entra SAML Toolkit and select it.
- In the Create Application popup, provide a name for your application.
- Click Create.
The application gets created with the specified name, and a new configuration screen will appear.
Step 3: Getting Startedar.
- On the configuration screen, Select Set up single sign on.
- Choose SAML from the available options.
Step 4: Configure SAML Settings
-
In the Base SAML Configuration section, fill in the following fields:
Field Value Example Identifier (Entiry ID) privacera_portalReply URL (Assertion Consumer Service URL) Self-Managed: https://PORTAL_HOST/saml/SSO
PrivaceraCloud:https://privaceracloud.com/SingleSignOnService/receiveResponseSign On URL Self-Managed: https://PORTAL_HOST/saml/SSO
PrivaceraCloud:https://privaceracloud.com/SingleSignOnService/receiveResponse -
Scroll down to the Attribute & Claims section to map user attributes:
Claim Name Type Value Optional/Required http://schemas.xmlsoap.org/ws/2005/05/identity/claims/nameSAML user.userprincipalnameRequired http://schemas.xmlsoap.org/ws/2005/05/identity/claims/emailaddressSAML user.mailRequired http://schemas.xmlsoap.org/ws/2005/05/identity/claims/givennameSAML user.givennameOptional http://schemas.xmlsoap.org/ws/2005/05/identity/claims/surnameSAML user.surnameOptional -
Click Next to proceed.
Step 5: Obtain Federation Metadata XML and URL
- Go to the SAML Certificates section.
- Locate the Federation Metadata XML.
- Click Download to obtain the metadata XML file.
- Copy the Login URL URL for the
Identity Provider Urlin Privacera Portal.
Step 6: Assign Users to the Application
- Go to the Users and Groups menu in the left navigation panel.
- Click Add User/Group and select the desired users or groups from the list.
- After selecting the users or groups, click Assign.
Important
Ensure users are already mapped to the appropriate groups in Azure AD before assigning them to the application.
Step 7: Optional - Configure Group Attribute
- Go to the Single Sign-On tab and scroll down to the Attributes & Claims section.
- Click Add a group claim.
-
In the Group Claim popup.
a. For the Which groups associated with the user should be returned in the claim? option, select All groups.
b. From the Source attribute dropdown, choose sAMAccountName.
-
Click Save.
You have now successfully configured an Azure SAML application for SAML SSO in the Azure console. This application is ready to integrate with the Privacera Portal.
Configure Azure AD in your Privacera Account.
Perform the following steps to configure Azure Ad integration in the Privacera Self-Managed (Portal).
Step 1: SSH into Privacera Instance
SSH into the instance where Privacera is installed.
Step 2: Run the following command to navigate to Privacera Manager Directory:
| Bash | |
|---|---|
Step 3: Copy the saml Sample Configuration File
Copy the sample saml configuration file to the custom configuration directory.
| Bash | |
|---|---|
Step 4: Edit the Configuration File
Open the configuration file using a text editor.
| Bash | |
|---|---|
Uncomment and edit the following properties:
If you have configured Group Attribute, uncomment and edit the following properties:
| YAML | |
|---|---|
Step 5: Upload the Renamed Metadata XML File to Privacera
- Locate the metadata XML file downloaded in Step 5. It is typically saved in the Downloads folder or the location where you chose to save it.
- Rename the file to
privacera-portal-aad-saml.xml
Step 6: Upload or Copy the File to Privacera Manager's Custom Properties Folder
Option 1: Using SCP (for Remote Servers)
- Open a terminal and run the following command to upload the file to the Privacera Manager’s custom properties folder: Replace
Bash <server-ip>with your server’s IP address anduserwith your username.
Option 2: Copy-Paste Locally
-
If the file is on the same server, move the
privacera-portal-aad-saml.xmlfile to the home directory. -
Use the following command to copy it to the custom properties folder:
Bash
Note
Ensure the privacera-portal-aad-saml.xml file is in the correct directory before running the cp command.
Step 7: Update Privacera Manager
- Navigate to the Privacera Manager directory:
Bash - Run the following command to update Privacera Manager:
Bash
Step 8: (Optional) Restart Privacera Portal in an Azure Kubernetes Environment
If you are configuring SSL in an Azure Kubernetes environment, restart the Privacera Portal to apply the changes.
| Bash | |
|---|---|
Step 9: (Optional) Role Mapping For Azure AD
Role mapping allows you to translate roles or groups from your Azure AD Identity Provider (IdP) into specific roles within Privacera. This ensures that users have the correct permissions and access when they log into Privacera.
What is Role Name Attribute?
The Role Name Attribute in your Identity Provider (IdP) contains the user's roles or group information. This attribute is used to identify the roles or groups the user belongs to in the IdP.
What is Role Mapping?
Role Mapping configures how roles or groups from the Identity Provider map to roles within the Privacera Portal:
- If a match is found, the mapped Privacera role is assigned to the user.
- If no match is found, the default role specified in the
PORTAL_SSO_DEFAULT_USER_ROLEproperty is assigned. If this property is not configured, theROLE_USERis applied by default.
Tip
Assign roles or groups from your Azure AD Identity Provider (IdP) to corresponding roles in the Privacera Portal for effective user access management.
Perform the following steps to access the SAML Role mapping settings on Privacera portal:
- Go to the Settings menu.
- Navigate to SSO Role Mapping.
- Select the SAML tab.
- Enter the role mapping details as per your requirements.
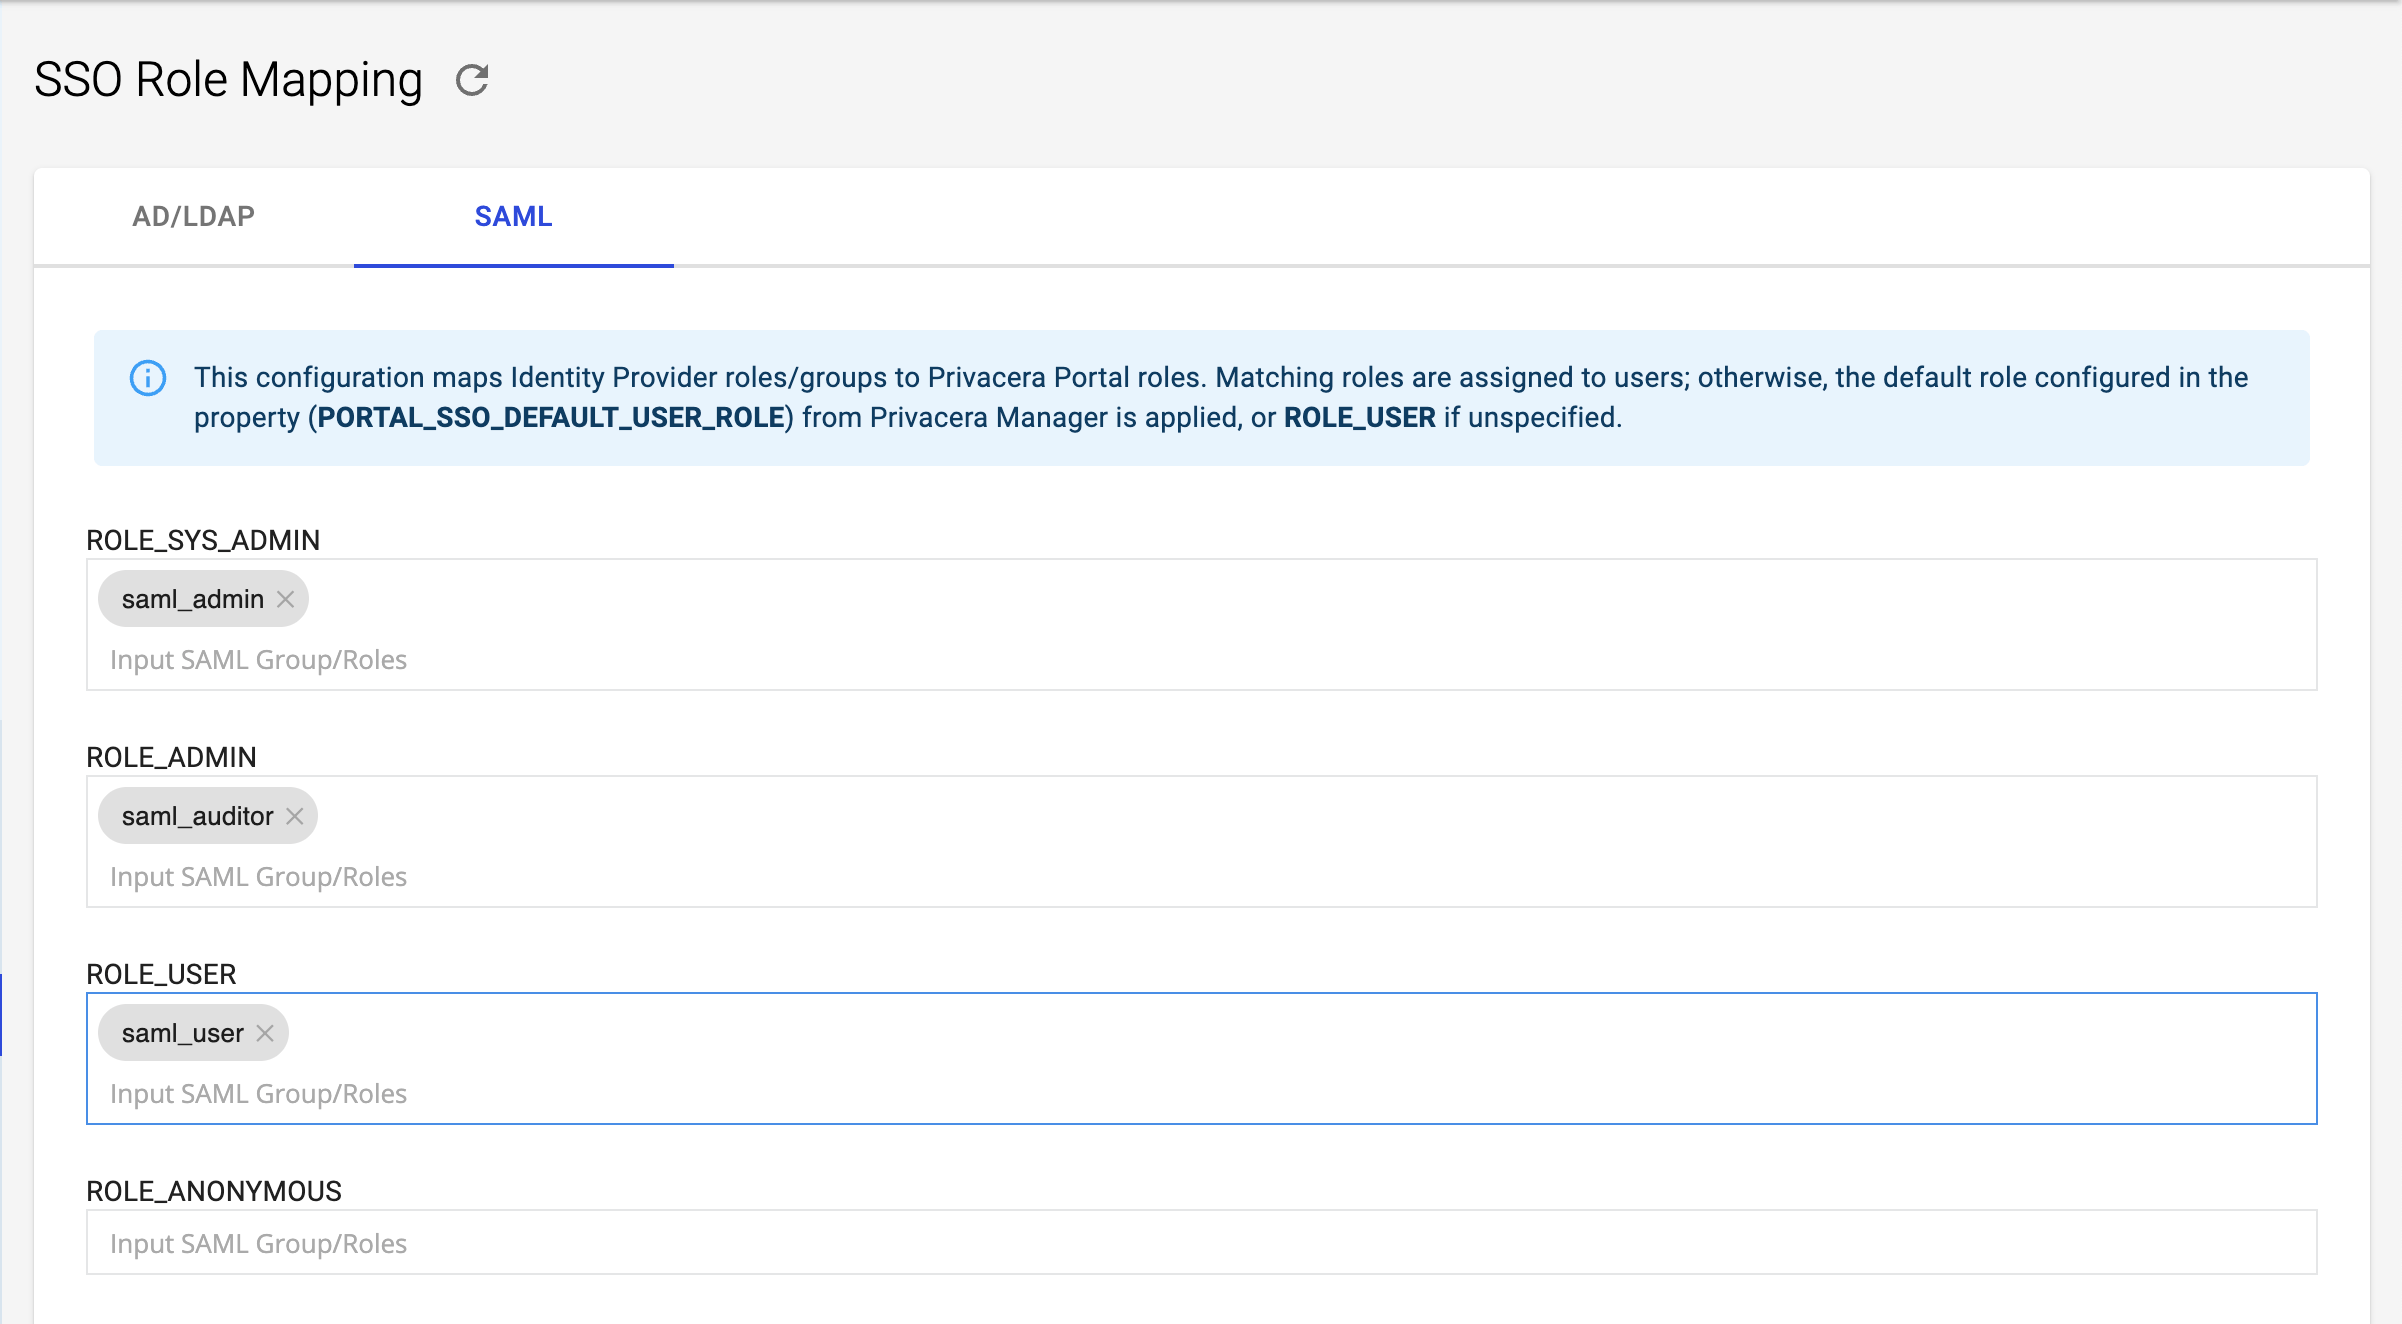
Reference image of Role Mapping form Privacera: 
Example:
- Mapped Privacera Role:
ROLE_SYS_ADMIN - Identity Provider (IdP) Role or Group:
saml_admin
In this example, if a user has the saml_admin role in Azure AD, they will be automatically assigned the ROLE_SYS_ADMIN role in Privacera.
Step 10: Verify SSO Login
After completing the setup, go to the Privacera Portal login page. An SSO Login button should be visible. Click it to log in using your Azure AD credentials.
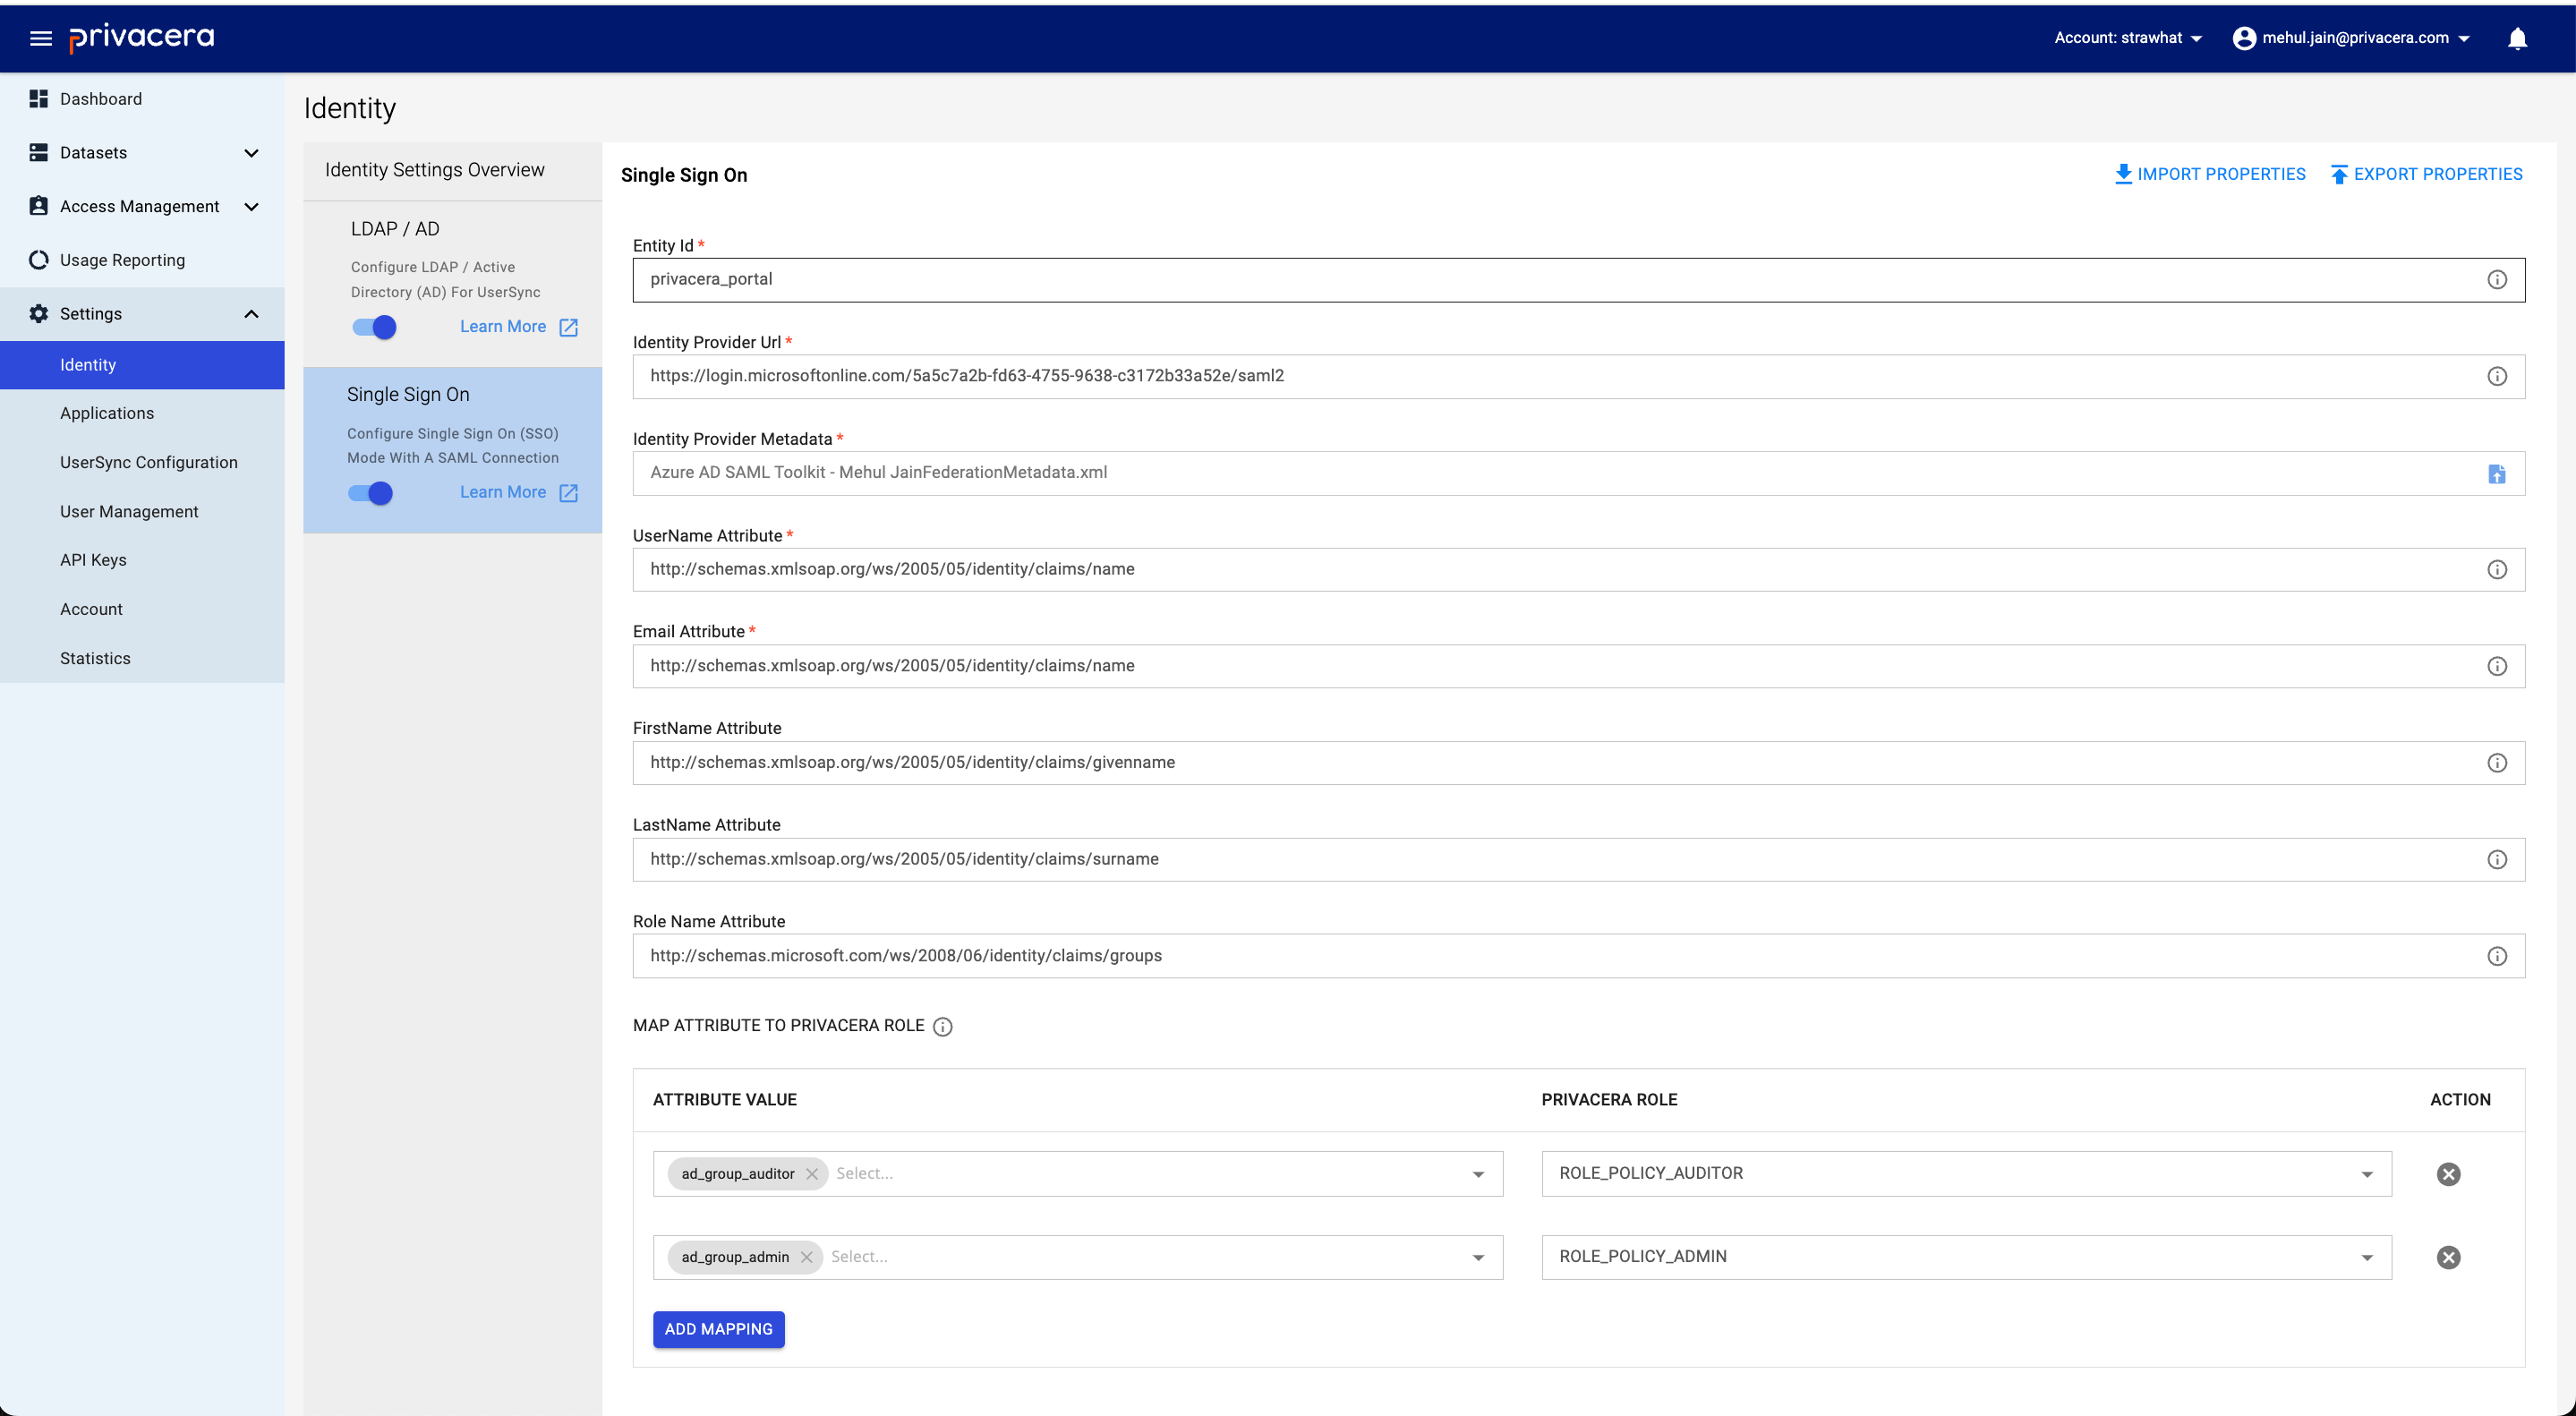
Perform the following steps to access the Single Sign-On settings:
- Go to the Settings menu.
- Select Identity.
- Click on Single Sign-On.
Reference image from PrivaceraCloud for better guidance: 
| Display Name | Description | Example Value | Optional/Required |
|---|---|---|---|
Entity Id | Entity ID for SAML configuration | privacera_portal | Required |
Identity Provider Url | Identity Provider URL | https://login.microsoftonline.com/5axxx6xx-xxxx-xxxx-xxxx-xxxxxx33x5xe/saml2 | Required |
Identity Provider Metadata | Metadata (XML file) | sso_saml_darth.xml | Required |
UserId | UserName attribute for SAML user | http://schemas.xmlsoap.org/ws/2005/05/identity/claims/name | Required |
Email | Email attribute for SAML user | http://schemas.xmlsoap.org/ws/2005/05/identity/claims/name | Required |
FirstName | FirstName attribute for SAML user | http://schemas.xmlsoap.org/ws/2005/05/identity/claims/givenname | Optional |
LastName | LastName attribute for SAML user | http://schemas.xmlsoap.org/ws/2005/05/identity/claims/surname | Optional |
Important
- Entity ID: Used to configure the Identity Provider (IdP).
- Identity Provider URL: The URL obtained in Step 5, where users will be redirected for SSO login.
- Identity Provider Metadata: Use the Metadata XML file downloaded in Step 5 for seamless SSO configuration.
- User Attributes: Ensure that the correct user attributes (
UserId,Email,FirstName,LastName) are mapped from Azure AD to Privacera.
These variables ensure seamless integration between Azure AD and Privacera for SAML-SSO.
Role Mapping For Azure AD
Role mapping allows you to translate roles or groups from your Identity Provider (IdP) — such as Okta, Ping Identity, OneLogin, Azure AD etc. — into specific roles within Privacera. This is crucial for ensuring that users have the correct permissions and access when they log into Privacera.
What is Role Name Attribute?
The Role Name Attribute in your Identity Provider (IdP) contains the user's roles or group information. This attribute is used to identify the roles or groups the user belongs to in the IdP.
What is Role Mapping?
Role Mapping configures how roles or groups from the Identity Provider map to roles within the Privacera Portal:
- If a match is found, the mapped Privacera role is assigned to the user.
- If no match is found, the default role,
ROLE_USER, is automatically assigned to the user.
| Variable Name | Description | Example |
|---|---|---|
Role Name Attribute | Role name attributes for user. | department |
Role Mapping | Role mapping for user. | Identity Provider (IdP) Role: example_role → Example Role: ACCOUNT_ROLE |
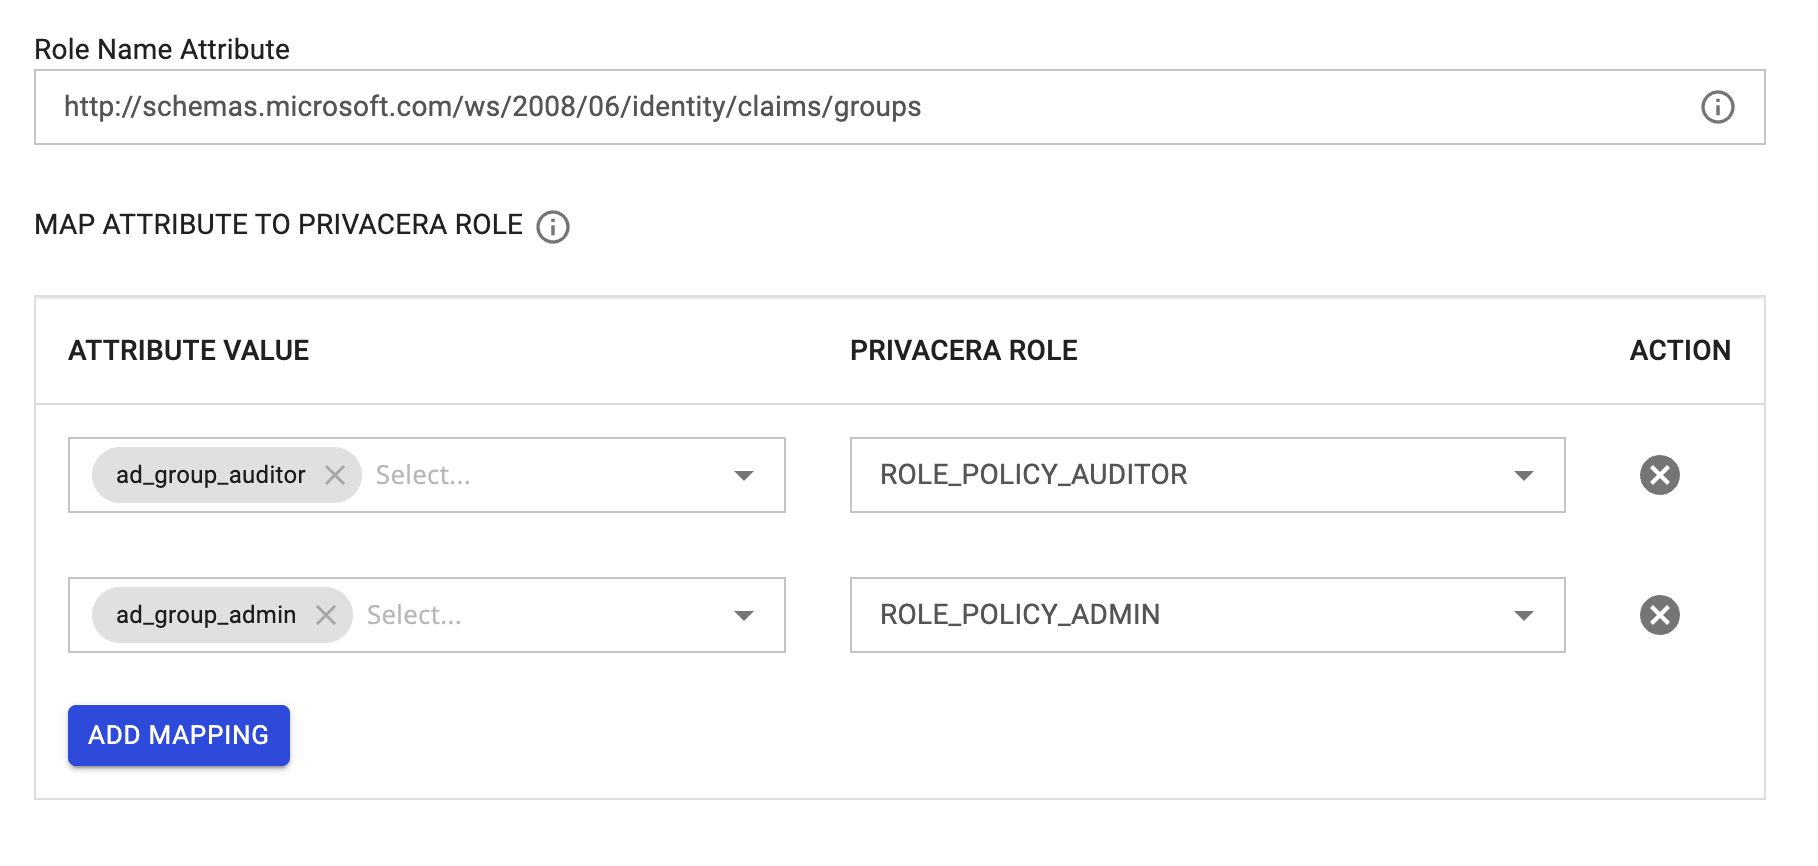
Reference image of Role Mapping form PrivaceraCloud: 
Example:
- Identity Provider (IdP) Role or Group:
ad_group_admin - Mapped Privacera Role:
ROLE_POLICY_ADMIN
In this example, if a user has the role ad_group_admin in Azure, they will automatically be assigned the ROLE_POLICY_ADMIN role in Privacera.
Important
Role mapping is applied only to users created after the mapping configuration is set up.
Properly configuring role mapping ensures that users are granted with the appropriate access levels in Privacera based on their roles or group memberships in the Identity Provider (IdP). This streamlines user management and provides seamless integration with your organization’s existing identity infrastructure.
After completing the configuration, test the setup by logging in to PrivaceraCloud using your Azure credentials. By doing so, you can verify that Single Sign-On (SSO) is functioning correctly.