Set Up a Ping Identity (SAML) Application
Ensure that you have Administrator access to your Ping Identity Account and Privacera.
Follow these steps to create and configure a Ping Identity application for Single Sign-On (SSO):
Step 1: Log in to Your Ping Identity Admin Console
- Log in using your administrator credentials.
Step 2: Create a New SAML Application
- In the Admin Console, navigate to Applications from the left-side menu.
- Click on Applications under the Applications tab.
- On the Applications page, click + Add Application and select SAML Application.
Step 3: General Information
- In the General Information section, provide a descriptive name for your application in the Application Name field.
For example:Privacera Portal SAML-SSO - (Optional) Upload a logo for the application if needed.
- Click Configure to proceed to the Configuration page.
Step 3: SAML Configuration
-
Choose the Manually Enter option to provide the SAML metadata manually:
- Fill in the required fields with the metadata information.
Field Value Example ACS URLs Self-Managed: https://PORTAL_HOST/saml/SSO
PrivaceraCloud:https://privaceracloud.com/SingleSignOnService/receiveResponseEntity ID privacera_portal- click Save to manually save the entered metadata.
Step 4: Configure SAML Connection
-
In the Attribute Mapping section, map user attributes:
Attribute Name Value Description UserIdusernameThe unique identifier for the user, typically their login name. EmailemailThe email address associated with the user. FirstNamegivenNameThe user's first name. LastNameFamily NameThe user's last name or surname. memberOfGroupNamesGroup NamesThis is optional attibute, The names of the groups to which the user belongs, for role mapping. -
Click Save to proceed.
Step 5: Assign Users/Groups to the Application
- Go to the Access tab of the newly created application.
- Click Add and select Users or Groups.
- Choose the users or groups you want to assign and click Add.
Important
It is assumed that the user is already mapped with the appropriate groups before being assigned to the application in Ping Identity.
Step 6: Review Your Configuration
- Review all the entered information and confirm that it is accurate.
- Click on the Toggle Button to enabled the application.
Step 7: Obtain Identity Provider Metadata
- Go to the Configuration tab of the newly created application.
- Scroll down to the SAML Settings section.
- Click on Download Metadata to download the metadata XML file.
This file will be used for configuring the SSO in Privacera Portal.
Step 8: Copy Initiate Single Sign-On URL
- Go to the Overview tab of the newly created application.
- Scroll down to the Initiate Single Sign-On URL section.
- Click the Copy Button to copy the URL for the
Identity Provider Urlin Privacera Portal.
You have successfully set up a Ping Identity application for SAML-SSO in the Ping Identity console. This application is now ready to be integrated with Privacera Portal.
Configure Ping Identity in your Privacera Account.
The steps to configure Ping Identity integration in the Privacera Self-Managed (Portal).
Step 1: SSH into Privacera Instance
SSH into the instance where Privacera is installed.
Step 2: Navigate to Privacera Manager Directory
| Bash | |
|---|---|
Step 3: Copy the saml Sample Configuration File
Copy the sample saml configuration file to the custom configuration directory.
| Bash | |
|---|---|
Step 4: Rename the downloaded metadata XML file from Ping Identity
- Locate the metadata file downloaded in Step 7, (usually in your
Downloadsfolder or the folder where you saved it). - Rename the file to
privacera-portal-aad-saml.xml
Step 5: Upload or Copy the File to Privacera Manager’s custom properties folder
Option 1: Using SCP (for Remote Servers)
- Open a terminal and run the following command to upload the file to the Privacera Manager’s custom properties folder: Replace
Bash <server-ip>with your server’s IP address anduserwith your username.
Option 2: Copy-Paste Locally
-
If the file is on the same server, move the
privacera-portal-aad-saml.xmlfile to the home directory. -
Use the following command to copy it to the custom properties folder
Ensure theBash privacera-portal-aad-saml.xmlfile is in the correct directory before running thecpcommand.
Step 6: Edit the Configuration File
Open the configuration file using a text editor and update the required fields.
| Bash | |
|---|---|
Uncomment and edit the following properties:
If you have configured Group Attribute, uncomment and edit the following properties:
| YAML | |
|---|---|
To use the full email address as the username when the SAML username attribute contains an email address, enable the following property:
| YAML | |
|---|---|
Behavior
- When enabled ("true"): The full email address is used as the username.
Example:jane.doe@xyz.com→jane.doe@xyz.com - When disabled ("false", default): Only the prefix before '@' is used.
Example:jane.doe@xyz.com→jane.doe
Configuration Impact
- New SSO logins will use the configured username format.
- Existing users will be affected by this change on their next login attempt.
- When enabled, the email address must be unique and not exist in the system when creating users.
Possible Conflict: Email Already in Use
A conflict may occur if the email address is already associated with another user in the system. This may prevent successful login during SSO authentication.
Example Scenario: When a user attempts to log in with email jane.doe@xyz.com, but this email is already associated with username jane.doe, the login will fail due to the conflict.
Resolution Steps: An administrator must
-
Remove the existing user from Settings → User Management
-
Remove the same user from Access Management → Users list
Troubleshooting
If you experience issues with SSO login, refer to the SSO Login Troubleshooting Guide for detailed steps and solutions.
Step 7: Update Privacera Manager
-
Generate the Helm charts. This step prepares the required Kubernetes configurations for deploying the Privacera services.
-
Apply the Helm charts. This will deploy the Privacera services to your Kubernetes cluster and may take a few minutes.
Bash -
Perform post-installation steps, such as generating the plugin tarball and updating Route 53 DNS. These steps are essential to finalize the deployment and ensure that all services are properly configured.
Bash
Step 8: Role Mapping For Ping-Identity (Optional)
Role mapping allows you to translate roles or groups from your Ping Identity Identity Provider (IdP) into specific roles within Privacera. This ensures that users have the correct permissions and access when they log into Privacera.
What is Role Name Attributes?
This attribute in your Identity Provider (IdP) contains the user's roles or group information. It is used to identify the roles or groups to which the user belongs in the IdP.
What is Role Mapping?
This configuration maps Identity Provider roles/groups to Privacera Portal roles. Matching roles are assigned to users; otherwise, the default role configured in the PORTAL_SSO_DEFAULT_USER_ROLE property in Privacera Manager is applied, or ROLE_USER if unspecified.
Tip
Assign Ping-Identity Identity Provider (IdP) roles or groups for the Privacera Portal roles.
In Privacera, follow these steps to access the SAML Role mapping settings:
- Go to the Settings menu.
- Navigate to SSO Role Mapping.
- Click on SAML tab.
Reference image of Role Mapping form Privacera: 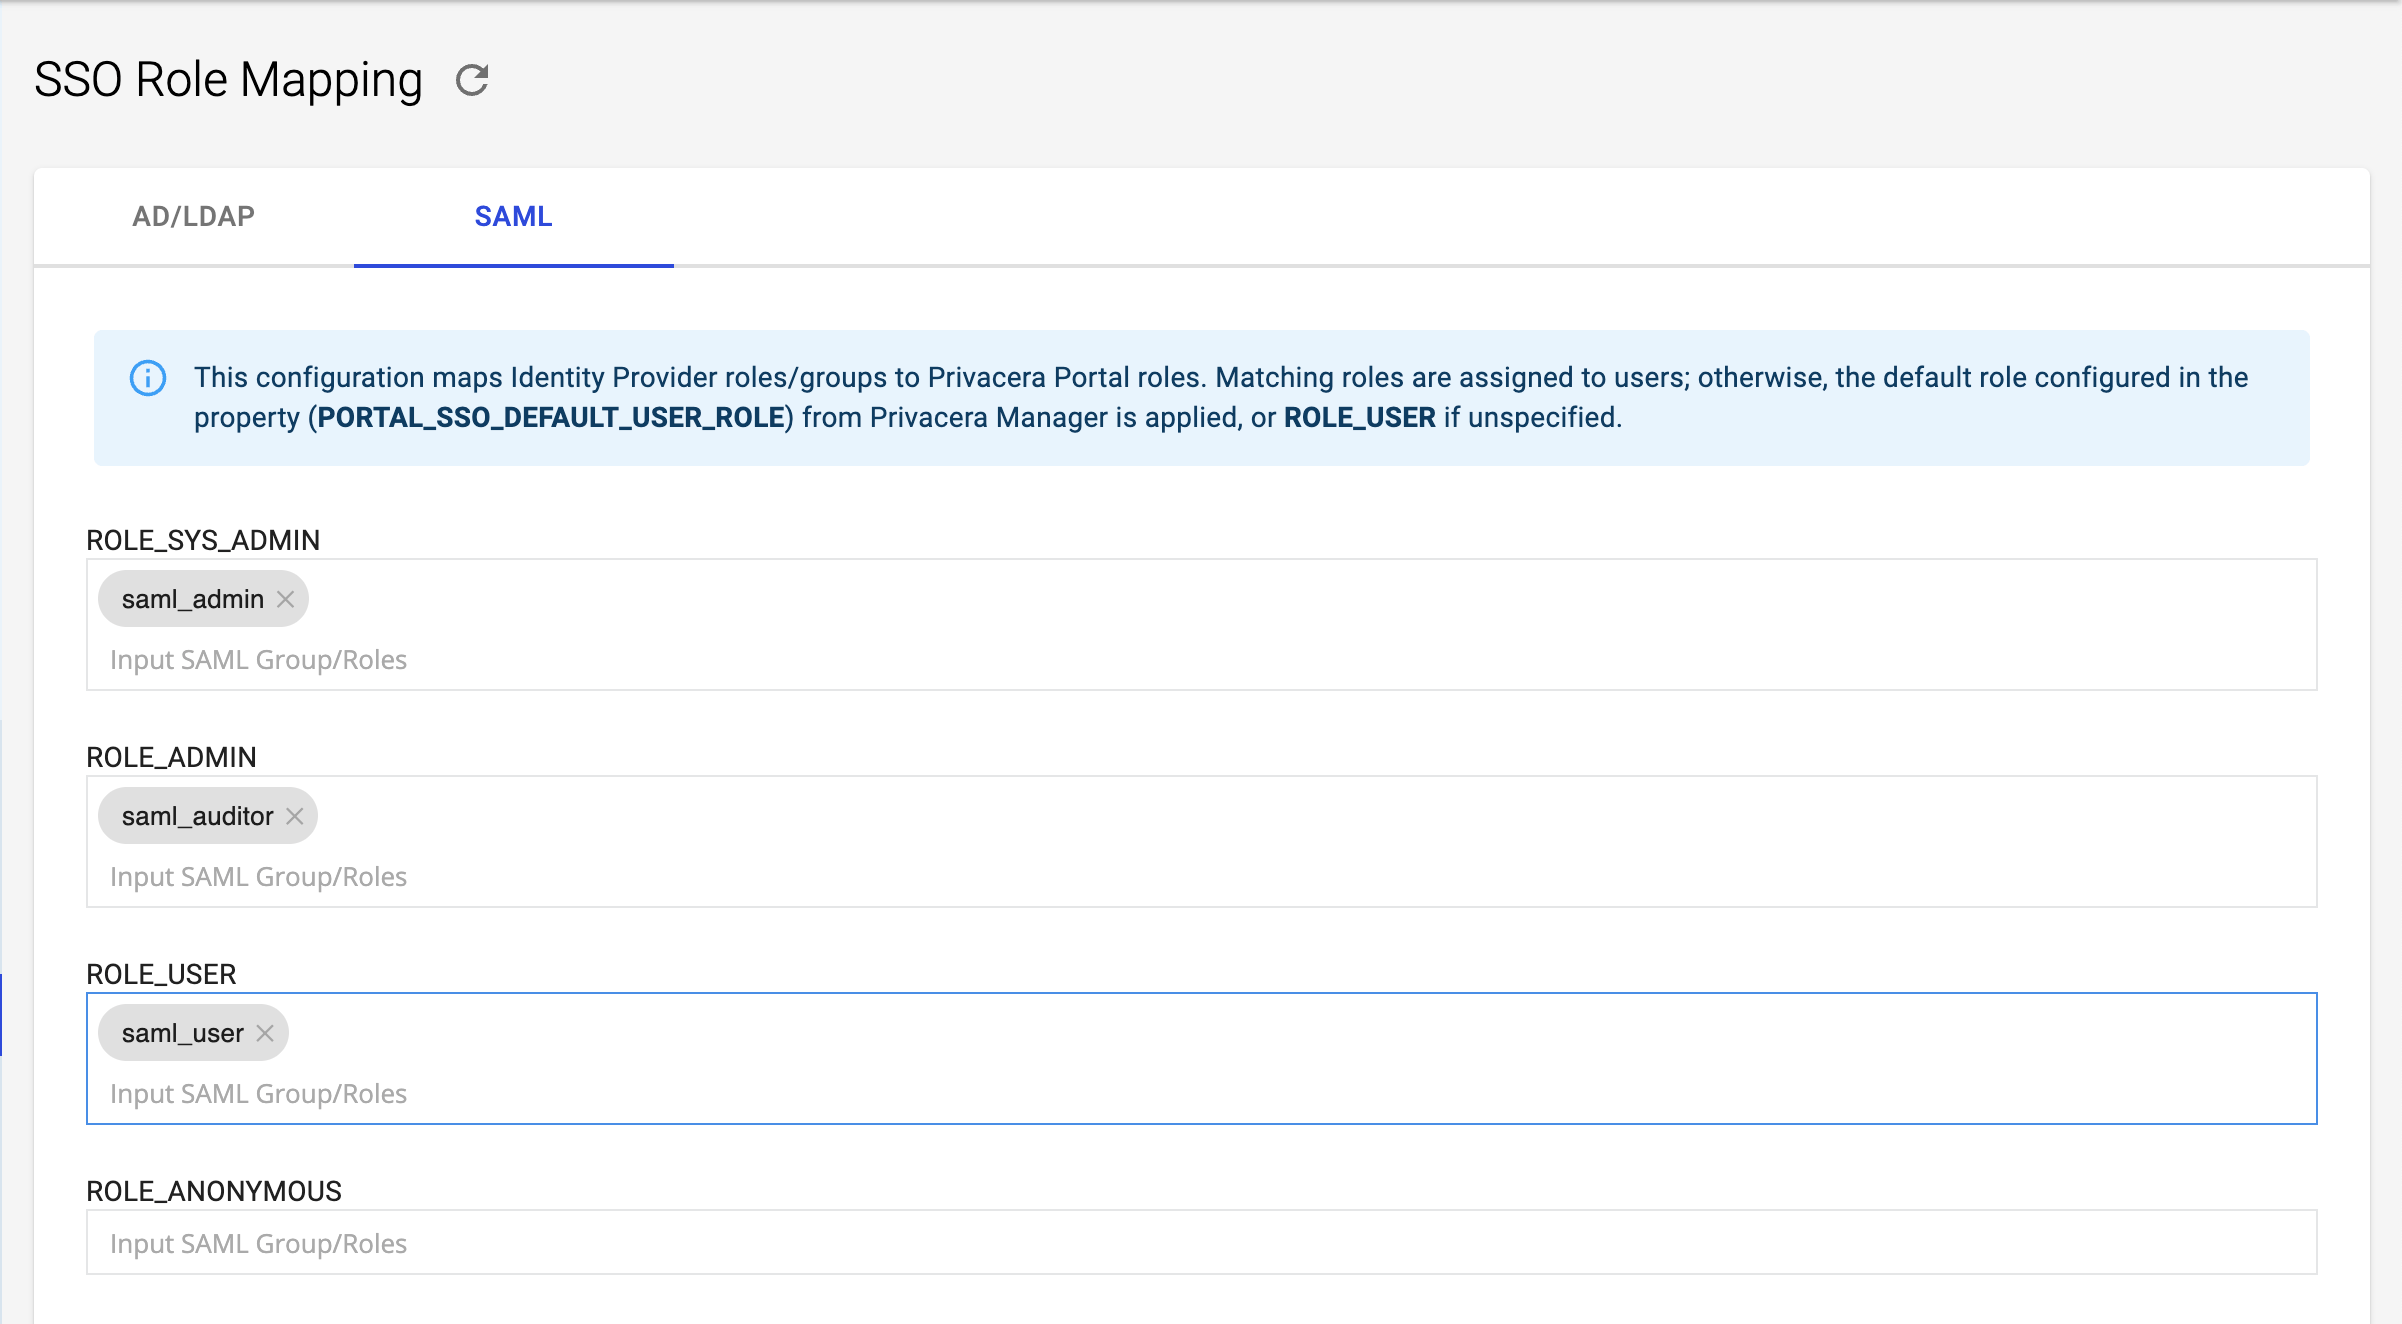
Example:
- Mapped Privacera Role:
ROLE_SYS_ADMIN - Identity Provider (IdP) Role or Group:
saml_admin
In this example, if a user has the role saml_admin in Ping-Identity, they will automatically be assigned the ROLE_SYS_ADMIN role in Privacera.
Step 9: Verify SSO Login
Once the setup is complete, navigate to the Privacera Portal login page. You should see an SSO Login button. Use this to log in with your Ping Identity credentials.
In Privacera, follow these steps to access the Single Sign-On settings:
- Go to the Settings menu.
- Navigate to Identity.
- Click on Single Sign-On.
Reference image from PrivaceraCloud for better guidance: 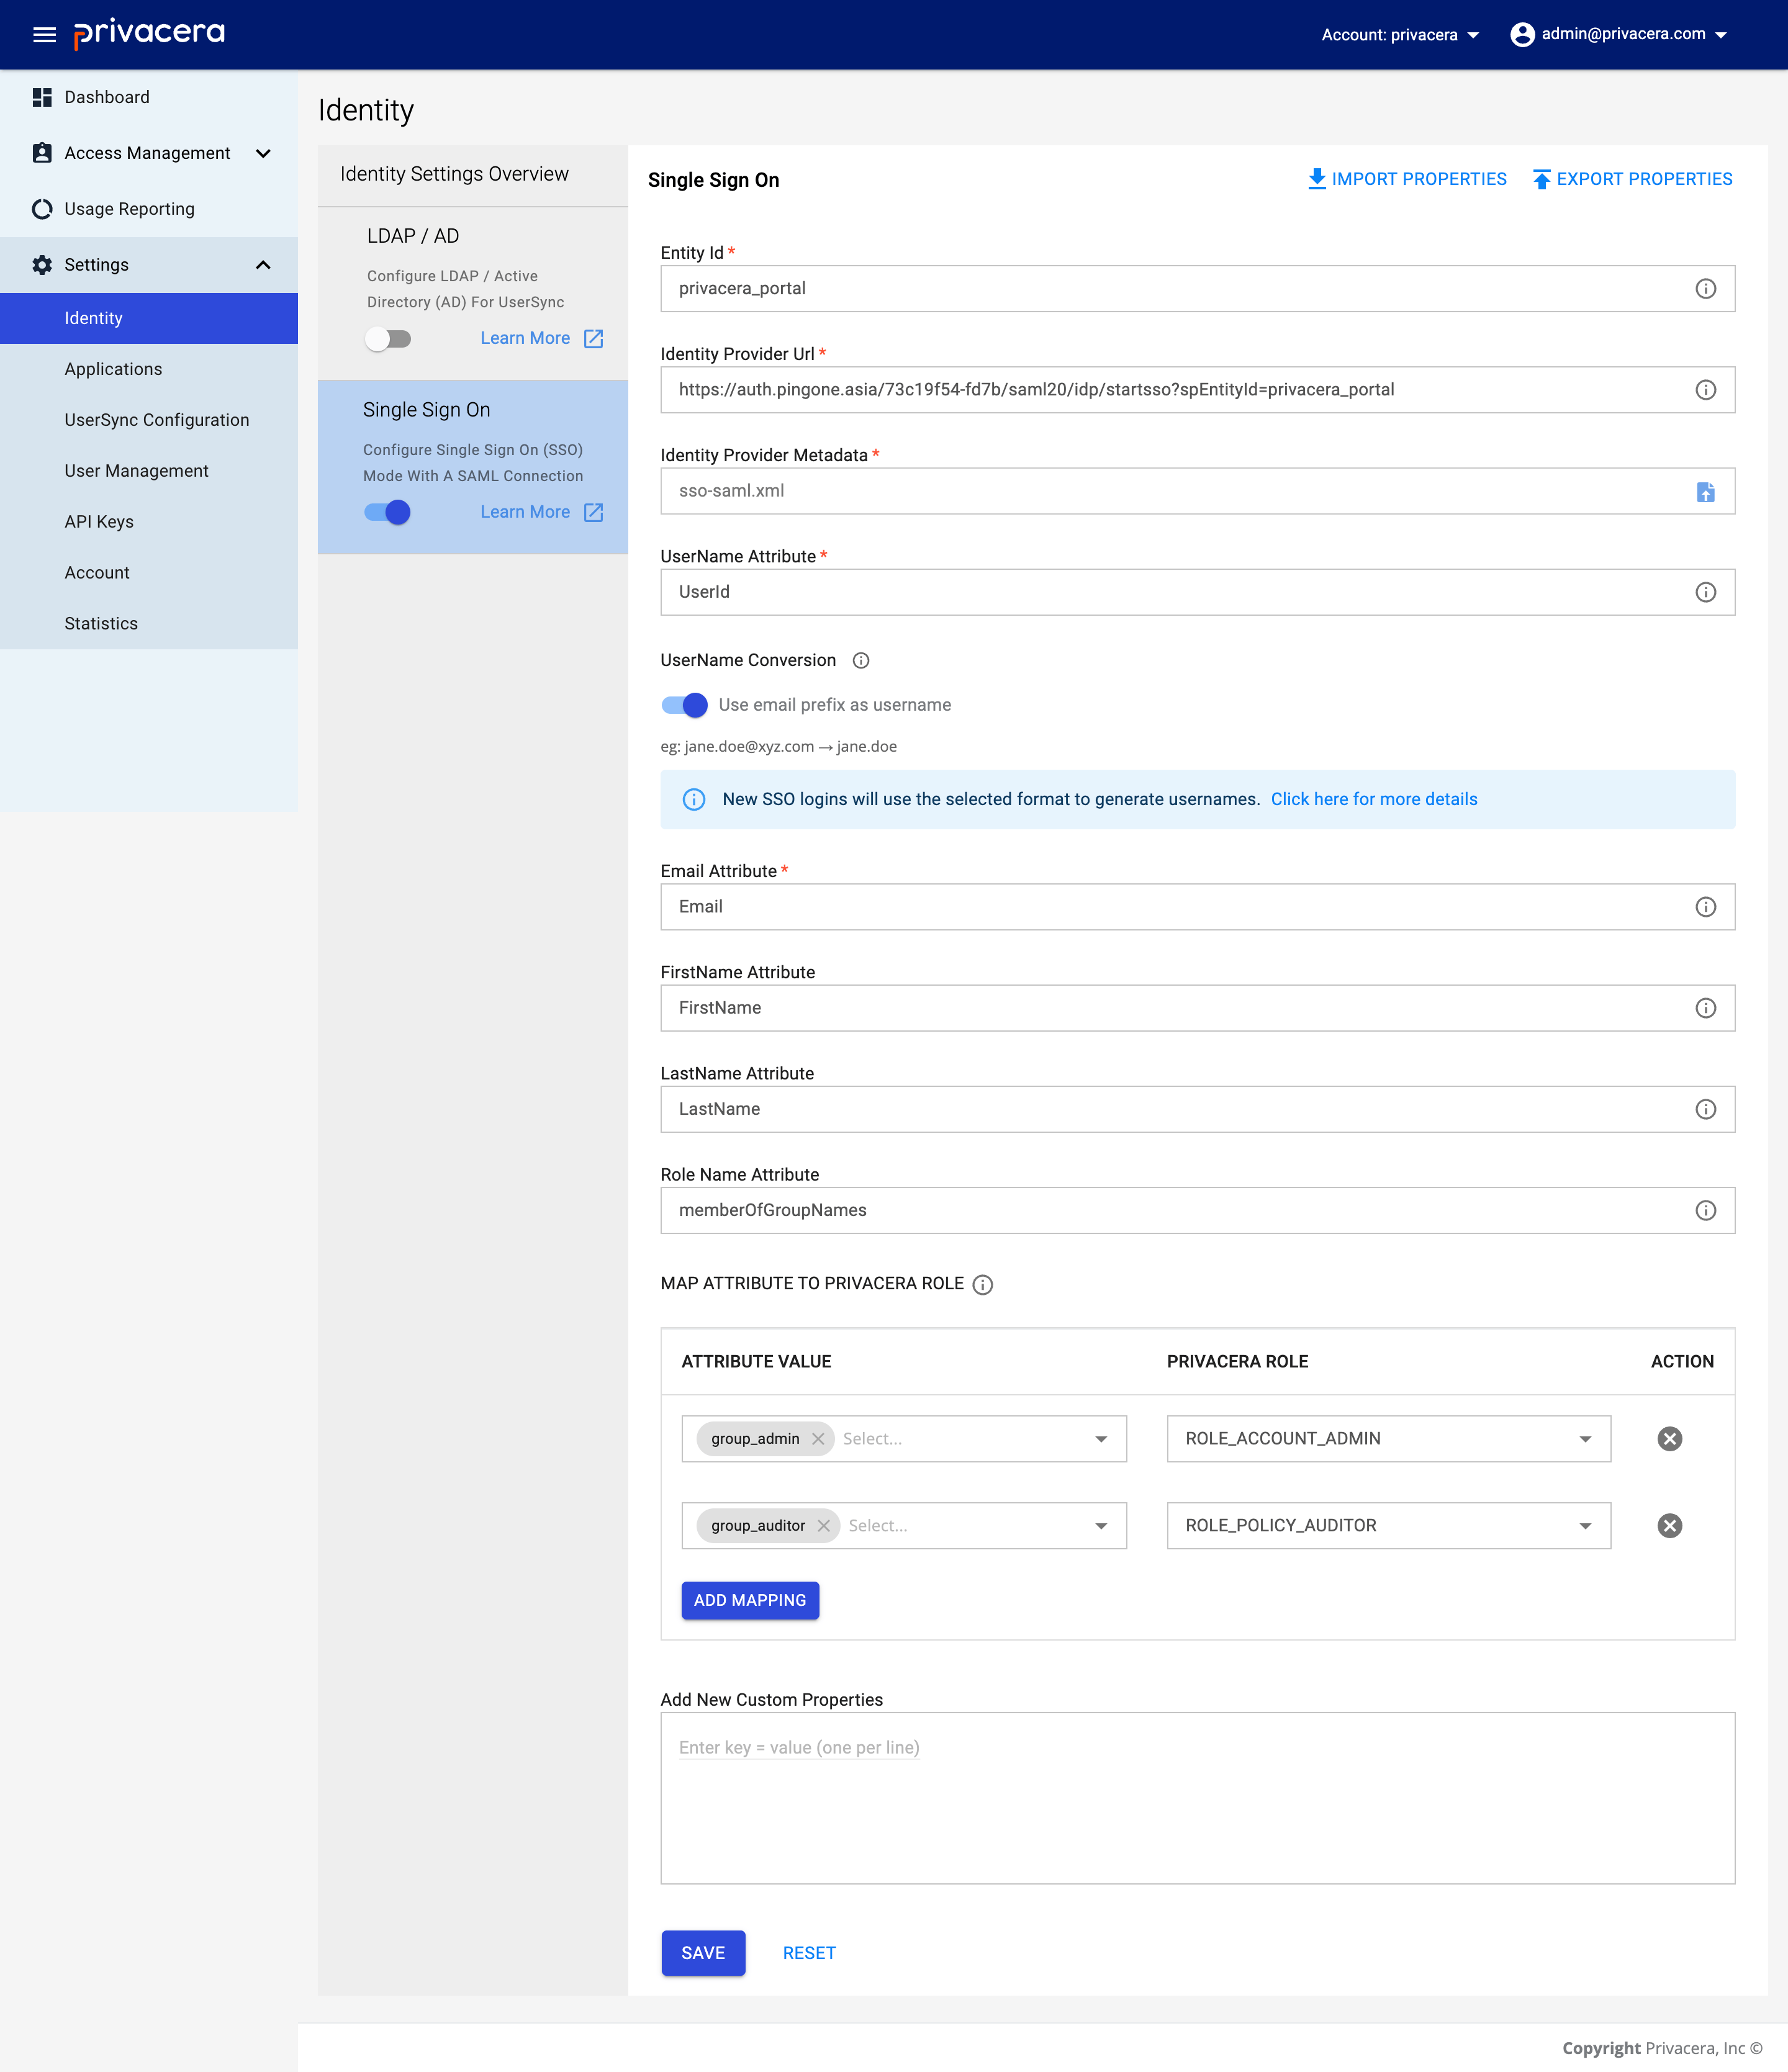
| Display Name | Description | Example Value | Optional/Required |
|---|---|---|---|
Entity Id | Entity ID for SAML configuration | privacera_portal | Required |
Identity Provider Url | Identity Provider URL | https://auth.pingone.asia/73c19f54-fd7b/saml20/idp/startsso?spEntityId=privacera_portal | Required |
Identity Provider Metadata | Metadata (XML file) | sso_saml_darth.xml | Required |
UserName Attribute | UserName attribute for SAML user | UserId | Required |
Email Attribute | Email attribute for SAML user | Email | Required |
FirstName Attribute | FirstName attribute for SAML user | FirstName | Optional |
LastName Attribute | LastName attribute for SAML user | LastName | Optional |
Username Conversion in SSO
This setting determines how usernames are generated during SSO login when the Username Attribute value contains an email address.
Username Format Options
-
When the toggle is ON: The system uses the email prefix (the part before @) as the username. Example:
jane.doe@xyz.com→jane.doe -
When the toggle is OFF: The system uses the full email address as the username. Example:
jane.doe@xyz.com→jane.doe@xyz.com
Important Considerations
Possible Conflict: Email Already in Use
A conflict may occur if the email address is already associated with another user in the system. This may prevent successful login or account linking during SSO authentication
Example Scenario: When a user attempts to log in with email jane.doe@xyz.com, but this email is already associated with username jane.doe, the login will fail due to the conflict.
Resolution Steps: An administrator must
-
Remove the existing user from Settings → User Management
-
Remove the same user from Access Management → Users list
Configuration Impact
- New SSO logins will use the configured username format
- Existing users will be affected by this change on their next login attempt.
Troubleshooting
If you experience issues with SSO login, refer to the SSO Login Troubleshooting Guide for detailed steps and solutions.
Important
- Entity ID: Used to configure the Identity Provider (IdP).
- Identity Provider URL: URL obtained in Step 7, where users will be redirected for SSO login.
- Identity Provider Metadata: Use the Metadata XML file downloaded in Step 7 for seamless SSO configuration.
- User Attributes: Ensure that the correct user attributes (
UserId,Email,FirstName,LastName) are mapped from Ping-Identity to Privacera.
These variables ensure seamless integration between Ping Identity and Privacera for SAML-SSO.
Role Mapping For Ping-Identity
Role mapping allows you to translate roles or groups from your Ping Identity Identity Provider (IdP) into specific roles within Privacera. This ensures that users have the correct permissions and access when they log into Privacera.
What is Role Name Attributes?
This attribute in your Identity Provider (IdP) contains the user’s roles or group information. It is used to identify the roles or groups the user belongs to in the IdP.
What is Role Mapping?
This configuration maps roles or groups from the Identity Provider (IdP) to corresponding roles in Privacera.If a specific role from the IdP matches a role defined in the role mapping configuration, that role is assigned to the user in Privacera. If no mapping is defined, the default role, ROLE_USER, is automatically assigned to the user.
| Variable Name | Description | Example |
|---|---|---|
Role Name Attribute | Role name attributes for user. | memberOfGroupNames |
Role Mapping | Role mapping for user. | Identity Provider (IdP) Role: example_role → Example Role: ACCOUNT_ROLE |
Reference image of Role Mapping form PrivaceraCloud: 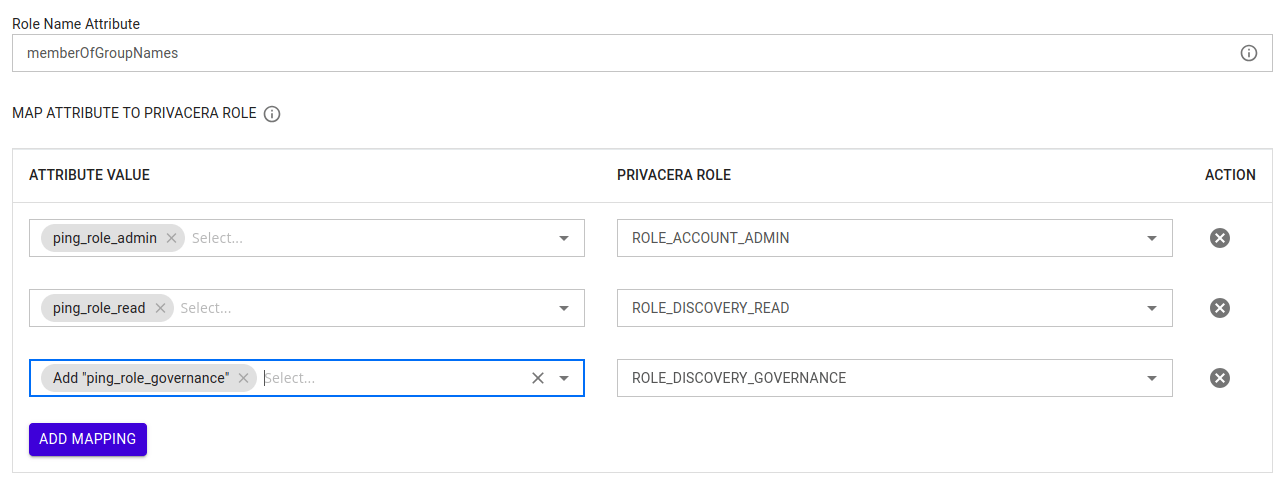
Example:
- Identity Provider (IdP) Role or Group:
saml_admin - Mapped Privacera Role:
ACCOUNT_ADMIN
In this example, if a user has the role saml_admin in Ping-Identity, they will automatically be assigned the ACCOUNT_ADMIN role in Privacera.
Important
New Users:
Role mapping only applies to newly created users after the mapping has been configured.
By properly configuring role mapping, you ensure that users are granted appropriate access levels within Privacera based on their roles or group memberships from the Identity Provider (IdP). This simplifies user management and ensures seamless integration with your organization’s existing identity infrastructure.
Once the configuration is complete, you can test the setup by attempting to log in to PrivaceraCloud using your Ping Identity credentials. This will help verify that the Single Sign-On (SSO) integration is working correctly.