Configuring Privacera PolicySync Connectors
This guide explains the common configuration settings for Privacera PolicySync connectors. Understanding these settings is essential for ensuring the connectors work correctly and are set up optimally.
Important: While this guide covers common settings, each connector type (e.g., Snowflake, Databricks) has specific properties. Always refer to the documentation for the individual connector you are configuring for complete details.
You can configure PolicySync connectors using different methods depending on your Privacera deployment:
| Configuration Method | Applies To | Description |
|---|---|---|
| PrivaceraCloud Portal UX | Privacera Cloud | Use the web interface in PrivaceraCloud. Connectors restart automatically when you save changes. |
| YAML Configuration File | Self-Managed & Data Plane | Edit the connector's .yaml configuration file directly. You must manually restart the connector using Privacera Manager scripts after any change to this file for the settings to take effect. |
| Privacera Portal UI / API (New) | Self-Managed (requires setup) | Use the web interface or APIs in your Self-Managed environment. Most changes apply immediately without a restart (hot-loaded). Requires initial setup: A one-time bootstrap process using Privacera Manager is needed to enable this feature for connector pods. |
Overview of Common Configuration Areas
These settings apply specifically to PolicySync connectors.
Most PolicySync connectors share the following categories of configuration settings. The sections below explain each area in more detail. Remember to check the specific connector's documentation for settings unique to that connector.
| Configuration Area | Purpose |
|---|---|
| Connection Details | How the connector authenticates and connects to the target data service (e.g., Snowflake, Databricks). |
| Managed Resources List | Specifies exactly which resources (like databases, tables, schemas) this connector will manage policies for. Includes ways to include or exclude resources. |
| Managed Principals for Policy Enforcement | Defines which Privacera users, groups, and roles the connector should create policies for. Includes filtering and mapping rules to match target system identities. |
| Managed Principals in Target Service | Allows the connector to automatically create and manage corresponding users, groups, or roles directly within the target data service. |
| Fine-Grained Access Control Methods | Determines whether to use the target data service's built-in security features (native) or Privacera's Secure Views for column/row-level policies. |
| Resource Sync Interval | How often the connector checks the target data service for new or changed resources (like new tables) and applies relevant policies. |
| Principal Sync Interval | How often the connector checks the target data service for changes in its users, groups, or roles. |
| Permission Sync Interval | How often the connector verifies and corrects permissions on managed resources in the target data service to match Privacera policies. |
| Recovery Mode | Automatic protection mechanism that prevents permission enforcement during RocksDB rebuilding scenarios to avoid incorrect access revocations. |
| Audit Retrieval Interval | How often the connector fetches audit logs from the target data service. |
| Migrating Existing Permissions | Guidance on converting permissions already set in the target data service into Privacera policies before activating the connector. |
| Recommended Onboarding Process | Best practices for enabling a new connector safely, such as starting with limited scope and monitoring before full enforcement. |
| Privately Signed SSL Configuration | Additional configuration steps required when using privately signed SSL certificates. |
| On-Demand Sync Backpressure Control | Enabling backpressure control prevents connector memory overload, RocksDB performance degradation, and slow restarts during high event volumes by limiting the number of queued on-demand tasks. |
| Policy Validity Evaluation | Enables automatic evaluation and enforcement of time-based validity periods defined in Privacera policies by PolicySync connectors. |
| Strict Row Filter Role Matching Evaluation | Controls whether strict role matching evaluation should be enabled for row filter policies across connectors that support row-level filtering. |
| Multiple Ranger Policy Repositories | Deploy multiple instances of the same connector type with dedicated Ranger service repositories, ensuring strict policy isolation and eliminating permission conflicts. |
| Skip Duplicate Ranger Changelogs | Controls whether duplicate Ranger changelog entries should be skipped to improve performance and reduce unnecessary processing overhead during policy updates and connector restarts. |
| Attribute-Based Principal Filtering | Allows the connector to selectively include or exclude roles, groups, and users based on configured attribute values when creating principals within the target data service. |
| Enhanced Policy Evaluation Ordering for Masking and RLF | Controls the enhanced policy evaluation ordering for Masking and Row Level Filter policies, providing predictable evaluation based on match types, priorities, and policy names. |
| Delete Old Solr Collection Data | Allows you to delete old Solr audit data that is no longer required. |
| Asynchronous Solr Audit Log Publishing | Enables async Solr audit writes to avoid blocking policy sync and improve throughput. |
| CHANGELOG Completion Audit Size Limits | Limits how many policies and how large each CHANGELOG completion audit document can be when written to Solr after a policy sync. |
| Unified Added/Updated Resource Processing | Processes added and updated resources in a single executor flow for efficiency. |
| Enable Synchronization to Service Explorer | Enables Resource and Permission metadata synchronization to Service Explorer for the connector. |
Connection Details
Connection Details
Each PolicySync connector needs configuration details to securely connect and authenticate to the target data service it manages. Common methods include:
- JDBC Connection String: Often used with a username/password or an authentication token.
- IAM Roles: Used by some cloud connectors (e.g., AWS Lake Formation) for authentication based on assigned cloud roles.
Refer to the specific connector's documentation for the exact connection parameters required.
You should provision a dedicated service user account for the connector within the target data service. Ensure this account has the required privileges to manage policies (create, modify, delete). Using a service account rather than a personal administrator account is recommended as it helps avoid confusion when investigating issues.
Policy Enforcement Scope
Policy Enforcement Scope
These settings define what the connector manages: which data resources and which users/groups/roles (principals).
Managed Resources List
This configuration specifies the exact data resources (like databases, schemas, tables, views) the connector is responsible for managing policies on. You define this scope using include/exclude patterns:
- Include Patterns: Define which resources the connector should manage. You can start with a small set and expand later.
- Exclude Patterns: Define specific resources the connector should ignore. This is useful for system tables, temporary resources, or resources the connector lacks permissions to manage.
- Manage All: You can configure the connector to manage all compatible resources discovered in the target data service.
The connector loads metadata only for the managed resources and applies Privacera policies to them.
View Access Control
View access control is managed through table-level policies. To grant permissions on a view, you must create a table-level policy using the view name as the resource identifier. The connector treats views as table resources for policy enforcement purposes, ensuring consistent access control across both tables and views.
Managed Principals for Policy Enforcement
Privacera policies are defined using Privacera users, groups, and roles (collectively called "principals"). The PolicySync connector translates these policies into commands (like GRANT/REVOKE or security policies) that the target system understands, applying them to corresponding principals within that target system.
For every Privacera user, group and role, a corresponding principal in the target system is used for assigning the grants. Most connectors create a group or role in the target system for every Privacera user, group or role using the mapping rules.
- Filtering Principals: You can configure the connector to only consider a subset of Privacera principals for policy enforcement. Use include/exclude patterns for users, groups, or roles.
- Use Case: This is helpful if you want to exclude certain application or service users from being managed by the connector.
- Filtering Users by Membership: You can further refine user scope by telling the connector to only manage users who belong to specific managed groups or roles. Set one of these properties to
true:CONNECTOR_<TYPE>_MANAGE_USER_FILTERBY_GROUP=trueCONNECTOR_<TYPE>_MANAGE_USER_FILTERBY_ROLE=true- (If both are set to
true, filtering by group takes precedence).
- Principal Mapping Rules: Privacera principals might have names or characters not supported by the target data service. Mapping rules automatically translate Privacera principal names into valid names for the target system.
- Character Replacement: Replace unsupported characters (e.g.,
-becomes_). - Prefixing: Add a prefix (e.g.,
priv_role_) to easily identify principals managed by Privacera within the target system. - Example: A Privacera role
PROD-DATA-ANALYSTmight be mapped to a target system group namedpriv_role_prod_data_analyst.
- Character Replacement: Replace unsupported characters (e.g.,
Managed Principals in Target Service
You can optionally configure the PolicySync connector to automatically create and manage the necessary users, groups, or roles directly in the target data service, based on the mapped Privacera principals.
- Enabled: The connector uses the mapping rules and prefix settings to create/manage principals (e.g., creates the
priv_role_prod_data_analystgroup in the target) and manage memberships (e.g., adds target users to this group). - Disabled: If you disable this feature, you are responsible for manually creating the required users, groups, or roles (with the correctly mapped names) in the target data service and managing their memberships.
For organizations using multiple PolicySync connectors, we recommend disabling the connector's automatic creation and management of users, groups, or roles in the target data service. Typically, enterprises prefer to manage identity provisioning through their own established processes or central systems.
Fine-Grained Access Control Methods
Fine-Grained Access Control Methods (Column/Row Level)
For implementing column-level and row-level security policies, PolicySync connectors typically offer two approaches:
- Native Security Features: Utilizes the target data service's built-in capabilities (like row access policies, column masking). Recommended if supported by the connector and target data service, as it's often more performant and integrated.
- Privacera Secure Views: The connector creates secure views in the target data service to enforce the policies. This is used when native features are unavailable or not chosen.
Refer to the specific connector's documentation to see which methods it supports. For more on secure views, see About Secure Views.
Synchronization Intervals
Synchronization Intervals
These settings control how often the PolicySync connector performs various background tasks to keep Privacera and the target data service synchronized. Setting appropriate intervals balances policy timeliness with performance and resource consumption (e.g., warehouse compute).
Resource Sync Interval
- What it does:
CONNECTOR_<TYPE>_RESOURCE_SYNC_INTERVALdefines how often the connector checks the target data service for new or modified managed resources (e.g., a new table matching the include patterns). When changes are detected, the connector evaluates and applies the relevant Privacera policies (e.g., issues GRANTs). - Considerations: A shorter interval means faster detection and policy application for new resources, but increases frequency of checks and potential compute usage on the target data service.
- Event-Based Alternative: Some connectors support event-driven updates (via API calls to the Ops-server) instead of, or in addition to, polling intervals, allowing for near real-time updates upon resource changes. Check connector documentation.
Principal Sync Interval
- What it does:
CONNECTOR_<TYPE>_PRINCIPAL_SYNC_INTERVALsets how often the connector checks the target data service for the status of its principals (users, groups, roles). - Purpose: Helps detect inconsistencies. For example, if a group managed by the connector was accidentally deleted in the target data service, this sync can detect the deletion and (if configured to manage principals) re-create it.
- Recommendation: This check is usually less critical to run frequently; intervals like once per day are often sufficient.
Permission Reconciliation Sync Interval
- What it does:
CONNECTOR_<TYPE>_PERMISSION_SYNC_INTERVALconfigures how often the connector performs a full reconciliation, checking the actual permissions on all managed resources in the target data service against the expected permissions defined by Privacera policies. - Purpose: Corrects any "permission drift" where manual changes or other issues have made the target data service inconsistent with Privacera policies.
- Considerations: This can be a resource-intensive operation, especially with many resources.
- Recommendation: Set this interval relatively high (e.g., once a day or even once a week) unless specific needs require more frequent reconciliation.
Note
The Permission Reconciliation Sync Interval is specifically for periodic reconciliation to correct any "permission drift" (differences between the target service and Privacera policies). This interval does not delay the application of new or updated policies defined in Privacera. The connector applies new policy changes immediately because it frequently polls Privacera Ranger for updates.
Audit Retrieval Interval
- What it does:
CONNECTOR_<TYPE>_AUDIT_SYNC_INTERVALsets how often the connector fetches access audit logs from the target data service and sends them to Privacera's audit store. - Excluding Users: You can configure a list of users (e.g., service accounts) whose audit records should not be collected. It is highly recommended to exclude the service principal used by the PolicySync connector itself, as its actions are usually operational and not relevant user activity audits.
Recovery Mode
Recovery Mode
Recovery mode is an automatic protection mechanism that optimizes RocksDB rebuilding. It does this by deferring permission grants until they are required, reducing startup time during initial resource loading.
How Recovery Mode Works
Recovery mode automatically activates when the RocksDB database folder is missing (for example, during a fresh start or after cleanup).
The process includes the following phases:
- Start Recovery Mode - Automatically activates when the RocksDB directory does not exist.
- Resource Loading - Loads all managed resources and creates changelog entries, but skips permission grants
- Permission Loading - Load permission from the service and performs grants/revokes only for resources with deltas (changes)
- Exit Recovery Mode - Automatically exits after completing both resource and permission loading cycles
Why skip grants during resource loading? Granting permissions for all resources during initial load is time-consuming. By deferring grants until permission loading, the connector only performs grants where deltas are detected, significantly improving startup time.
When Recovery Mode Does NOT Activate
Recovery mode does not activate when any on-demand-only mode is enabled, even if the RocksDB directory is empty.
SYNC_RESOURCE_ONDEMAND_ONLY_ENABLE=trueSYNC_SERVICEPOLICY_ONDEMAND_ONLY_ENABLE=true
In on-demand only mode, there is no scheduled loading process, so Recovery Mode's optimization is not needed.
Monitoring Recovery Mode
You can identify recovery mode activity in the connector logs. [CONNECTOR_NAME] represents the name of your connector.
Connector Logs:
| Text Only | |
|---|---|
Grafana Dashboards: Recovery mode metrics and phase information are available in Grafana panels for real-time monitoring.
Migrating Existing Permissions
Migrating Existing Permissions
Critical Step: Before enabling active policy enforcement by the PolicySync connector on a target data service that already has users and permissions configured natively:
- Identify Existing Permissions: Determine the permissions currently granted directly within the target data service.
- Translate to Privacera Policies: Replicate these permissions as policies within Privacera Ranger. Ensure users, groups, roles, resources, and access levels match.
- Verify Policies: Confirm the Privacera policies accurately reflect the necessary access.
Why this is crucial: If you enable the connector to enforce policies before migrating existing permissions, the connector may interpret the lack of corresponding Privacera policies as intent to revoke those native permissions. This can cause service disruptions by removing access users currently rely on.
- Assistance: Migrating complex permission schemes may require custom scripting. Contact Privacera professional services or support for guidance and assistance.
Recommended Onboarding Process
Recommended Onboarding Process
To safely introduce a PolicySync connector and minimize risk, follow these steps:
- Start Small: Configure the Managed Resources List to include only a limited, non-critical subset of resources initially (e.g., a specific test schema or database).
- Observe Mode (Disable Enforcement): Configure the connector to synchronize but not actively enforce policies initially. This often involves setting a specific property (like
CONNECTOR_<TYPE>_GRANT_UPDATEStofalse- check the specific connector's documentation for the exact property name) to disable GRANT/REVOKE actions or policy creation. - Monitor: Run the connector in this observe/read-only mode. Check the connector logs and potentially the Privacera audits/reports to verify:
- It connects successfully.
- It correctly identifies the intended managed resources and principals.
- It calculates the expected permissions based on your Privacera policies without applying them.
- Gradual Enforcement: Once confident the connector behaves as expected in observe mode:
- Enable policy enforcement (e.g., set
CONNECTOR_<TYPE>_GRANT_UPDATEStotrue). - Monitor the target system and connector logs closely.
- Enable policy enforcement (e.g., set
- Expand Scope: Gradually increase the scope by adding more resources to the Managed Resources List, monitoring carefully after each expansion.
Privately Signed SSL Configuration
Privately Signed SSL Configuration
When your environment uses privately signed SSL certificates, additional configuration is required to ensure secure communication between PolicySync connectors and the Ops Server. This section guides you through the necessary setup steps.
Configuration Steps
-
Connect to your Privacera Manager instance via SSH.
-
Edit the configuration file:
Bash -
Add or update the following properties:
-
Apply the changes by running the Privacera Manager update commands:
Step 1 - Setup which generates the helm charts. This step usually takes few minutes.
Step 2 - Apply the Privacera Manager helm charts. Step 3 - (Optional) Post-installation step which generates Plugin tar ball, updates Route 53 DNS and so on. This step is not required if you are updating only connector properties.
On-Demand Sync Backpressure Control
On-Demand Sync Backpressure Control
Refer On-Demand Sync for PolicySync Connectors for more details on On-Demand Sync and its Setup.
During event spikes in on-demand sync, connectors may download and queue all events from the Ops Server, which can lead to increased memory usage and impact the performance of the RocksDB store. This behavior also slows down connector restarts, as all queued events must be reloaded into memory.
To mitigate this, the below properties limit the number of on-demand tasks retrieved from the Ops Server. This mechanism helps prevent excessive memory consumption and ensures stable connector performance during periods of high event volume.
- ChangeLog Queue Threshold: Specifies the maximum number of change logs that can be queued before task fetching is paused. Serves as a backpressure control mechanism to prevent system overload. The default value is
100. - On Demand Task Batch Size: Defines the maximum number of on-demand tasks to fetch in a single batch. Task fetching stops once this limit is reached, regardless of pagination settings. The default value is
50 - On Demand Task Page Size: Determines the number of tasks to fetch per page when pagination is enabled. If set to 0 or a value greater than the batch size, pagination is effectively disabled. The default value is
0(pagination is disabled by default). When enabled, tasks are fetched page by page and processed in parallel until the batch size limit is reached.
You can adjust these values based on your connector's available memory and expected event volume.
-
Connect to your Privacera Manager instance via SSH.
-
Edit the connector-specific configuration file:
Bash - Replace
<connector-name>with your connector name (e.g.,snowflake,databricks-sql-analytics,bigquery). - Replace
<instance-name>with your instance name (e.g.,instance1,instance2). - Replace
<TYPE>with your connector name (e.g.,snowflake,databricks.sql.analytics,bigquery).
- Replace
-
Add or update the queue threshold property:
-
Once the properties are configured, run the following commands to update your Privacera Manager platform instance:
Step 1 - Setup which generates the helm charts. This step usually takes few minutes.
Step 2 - Apply the Privacera Manager helm charts. Step 3 - (Optional) Post-installation step which generates Plugin tar ball, updates Route 53 DNS and so on. This step is not required if you are updating only connector properties.
-
In PrivaceraCloud portal, navigate to Settings -> Applications.
-
On the Connected Applications screen, select the desired Application.
-
Click the pen icon or the Account Name to modify the settings.
-
On the Edit Application screen, go to Access Management -> ADVANCED tab.
-
Under Add New Custom Properties, add the following property:
-
Click SAVE to apply the changes.
Policy Validity Evaluation
Policy Validity Evaluation
Policy Validity Evaluation enables PolicySync connectors to automatically evaluate and enforce time-based validity periods defined in Privacera policies. When enabled, the connector periodically checks policy validity periods and automatically grants or revokes access based on the specified time ranges.
A Policy Validity Period allows a policy author to define when a policy is active. This feature is typically used to schedule resource accessibility for a specific timeframe, such as:
- From 2025-01-31 16:07:27 to 2026-04-30 16:10:30
The following properties control the automatic evaluation of policy validity periods by PolicySync connectors:
-
Policy Validity Evaluation Sync Enable: Enables or disables automatic evaluation of policy validity periods by the PolicySync connector. When set to
true, the connector periodically checks all managed policies and applies or revokes access based on the current time. The default value isfalse. -
Policy Validity Evaluation Sync Interval Minutes: Specifies the interval (in minutes) at which the connector evaluates policy validity periods. Default value is
60minutes.
Policy Evaluation Delay
Users may experience a delay in policy application when scheduled tasks are still being processed in PolicySync. As a result, users might be unable to access data even within the validity period, or may retain access for a short duration after expiry.
-
Connect to your Privacera Manager instance via SSH.
-
Edit the connector-specific configuration file:
vi ~/privacera/privacera-manager/config/custom-vars/connectors/<connector-name>/<instance-name>/vars.connector.<TYPE>.yml- Replace
<connector-name>with your connector name (e.g.,snowflake,databricks-sql-analytics,bigquery). - Replace
<instance-name>with your instance name (e.g.,instance1,instance2). - Replace
<TYPE>with your connector name (e.g.,snowflake,databricks.sql.analytics,bigquery).
- Replace
-
Add or update the following properties:
-
Once the properties are configured, run the following commands to update your Privacera Manager platform instance:
Step 1 - Setup which generates the helm charts. This step usually takes few minutes.
Step 2 - Apply the Privacera Manager helm charts. Step 3 - (Optional) Post-installation step which generates Plugin tar ball, updates Route 53 DNS and so on. This step is not required if you are updating only connector properties.
Validation Steps:
To validate policy validity configuration:
- Create a new Resource Policy (Access, Tag, or Row-Level Filter).
- Click ADD VALIDITY PERIOD from the top-right corner.
- Under Policy Validity Period, specify:
- Start Time
- End Time
- Time zone
- Click SAVE.
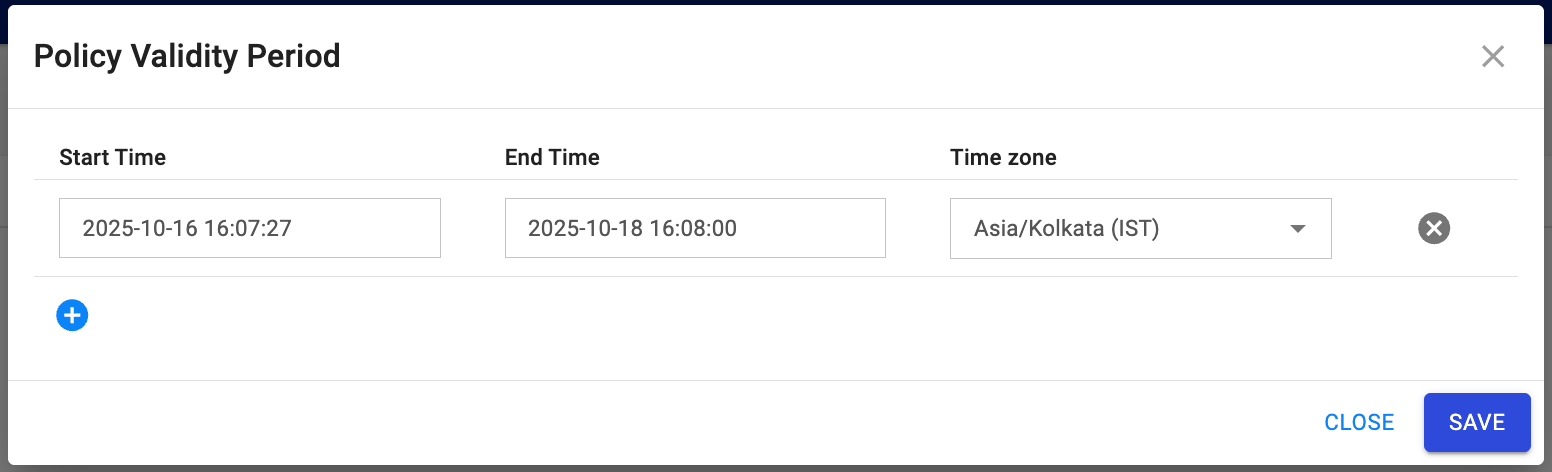
- Save the policy.
Strict Row Filter Role Matching Evaluation
Strict Row Filter Role Matching Evaluation
This configuration controls whether strict role matching evaluation should be enabled for row filter policies across all connectors that support row-level filtering.
CONNECTOR__STRICT_ROW_FILTER_ROLE_MATCHING_EVALUATION_ENABLED
Default Value: "false"
Description: When enabled, the connector will perform strict role-matching evaluation for row filter policies. By default, the connector uses the first row filter item, but this setting ensures comprehensive role evaluation across all applicable policy items.
Supported Connectors: This configuration is available for the following connectors:
- Snowflake (
CONNECTOR_SNOWFLAKE_STRICT_ROW_FILTER_ROLE_MATCHING_EVALUATION_ENABLED)
-
Connect to your Privacera Manager instance via SSH.
-
Edit the connector-specific configuration file:
Bash -
Replace
<connector-name>with your connector name (e.g.,snowflake,databricks-sql-analytics). - Replace
<instance-name>with your instance name (e.g.,instance1,instance2). -
Replace
<TYPE>with your connector name (e.g.,snowflake,databricks.sql.analytics). -
Add or update the property (replace
<TYPE>with your connector type):YAML -
Once the properties are configured, run the following commands to update your Privacera Manager platform instance:
Step 1 - Setup which generates the helm charts. This step usually takes few minutes.
Step 2 - Apply the Privacera Manager helm charts. Step 3 - (Optional) Post-installation step which generates Plugin tar ball, updates Route 53 DNS and so on. This step is not required if you are updating only connector properties.
-
In PrivaceraCloud portal, navigate to Settings -> Applications.
-
On the Connected Applications screen, select the desired Application.
-
Click the pen icon or the Account Name to modify the settings.
-
On the Edit Application screen, go to Access Management -> ADVANCED tab.
-
Under Add New Custom Properties, add the following property:
Bash -
Click SAVE to apply the changes.
Multiple Ranger Policy Repositories
Multiple Ranger Policy Repositories
Privacera connectors support multiple Ranger policy repositories, enabling you to deploy several instances of the same connector type with isolated policy management. Each instance can be configured to use its own dedicated Ranger service repository, ensuring complete policy isolation and preventing conflicts across connector instances.
Configuration Workflow
To configure multiple Ranger policy repositories for a connector:
- Create service repositories in Privacera Portal (e.g.,
privacera_snowflake_prod,privacera_snowflake_dev). - Configure each connector instance to point to its own repository.
- Self Managed/Data Plane: Create separate
connector-custom.propertiesfiles. - PrivaceraCloud: Create multiple applications and set repository properties.
- Self Managed/Data Plane: Create separate
- Apply and validate the changes to confirm policy isolation across instances.
Prerequisites
Before configuring multiple Ranger policy repositories, ensure that the required service repositories are created in your Privacera portal.
Creating a Custom Service Repository
Example: Creating a Custom Snowflake Service Repository
The following example demonstrates how to create a custom Snowflake service repository named privacera_snowflake_prod. Use similar steps for other connector types (BigQuery, Databricks Unity Catalog, Databricks SQL, Redshift, etc.).
Steps:
-
Access Privacera Portal: Log in to your Privacera portal.
-
Navigate to Resource Policies: Go to Access Management → Resource Policies.
-
Add New Service:
- Under SNOWFLAKE, click the more icon .
- Select Add Service.
-
Configure Service Settings:
- Service Name:
privacera_snowflake_prod - Active Status: Toggle to enable
- Tag Service: Select
privacera_tagfrom the dropdown - Username:
snowflake - Common Name for Certificate:
Ranger
- Service Name:
-
Save Configuration: Click SAVE to create the service repository.
Implementation Approaches
There are two primary approaches for implementing multiple Ranger policy repositories:
-
Approach 1: Dedicated Security Zone (SZ) Configurations
- Use Privacera's Security Zone functionality to create isolated policy management environments.
- Each connector instance runs within its own dedicated security zone, ensuring complete policy isolation.
-
Approach 2: Separate Ranger Service Repository Instances
- Create multiple Ranger service repositories within the same Privacera instance.
- Each connector instance points to its own dedicated repository, allowing independent policy control.
Configuration Steps
Select the configuration method that applies to your deployment model. The steps below are generic and can be applied across all connector types (e.g., Snowflake, Databricks SQL, Databricks Unity Catalog, Redshift, BigQuery).
Each connector instance must be configured to use its own dedicated Ranger service repository to ensure complete policy isolation.
Configuration Requirements
- Replace
<connector-type>,<instance-name>,<service-name-1>, and<service-name-2>with your actual values. - Create separate configuration files for each connector instance.
- Ensure that each connector instance points to a unique Ranger service repository.
- Use clear, descriptive naming conventions for easy identification and ongoing management.
-
SSH to the instance where Privacera Manager is installed.
-
Create the configuration directory and file for the first instance:
Bash Add the following property to point to the first service repository:
Propertiesranger.policysync.connector.0.ranger.service.name=privacera_<connector-type>_<Service-name-1>Example:
- Snowflake:
-
Create the configuration directory and file for the second instance:
Bash Add the following property to point to the second service repository:
Propertiesranger.policysync.connector.0.ranger.service.name=privacera_<connector-type>_<Service-name-2>Example:
- Snowflake:
-
Apply Configuration Changes:
After configuring all instances, apply the changes by running the Privacera Manager update commands:
Step 1 - Setup which generates the helm charts. This step usually takes few minutes.
Step 2 - Apply the Privacera Manager helm charts. Step 3 - (Optional) Post-installation step which generates Plugin tar ball, updates Route 53 DNS and so on. This step is not required if you are updating only connector properties.
-
Create Multiple Applications:
In the PrivaceraCloud portal, create separate applications for each connector instance:
- Navigate to Settings → Applications.
- Click Add Application for each instance.
- Configure each application with different names (e.g.,
<connector-type>-prod,<connector-type>-dev).
-
Configure Repository Settings
For each application, configure the repository-specific properties:
- Go to Access Management → ADVANCED tab.
- Add the appropriate custom properties based on your connector type.
- Configure the service name property for each instance:
- Instance 1:
ranger.policysync.connector.0.ranger.service.name=privacera_<connector-type>_{Service-name-1} - Instance 2:
ranger.policysync.connector.0.ranger.service.name=privacera_<connector-type>_{Service-name-2}
- Instance 1:
Example:
- Snowflake:
-
Click SAVE to apply the changes for each application.
Resource Isolation Requirements
To avoid permission conflicts between connector instances, ensure complete resource isolation by following these practices:
- Separate Managed Resources: Configure each instance with its own Managed Resources List (databases, schemas, or tables).
- Distinct Principal Management: Assign different user groups, roles, or service principals to each instance.
- Unique Naming Patterns: Use clear prefixes or naming conventions to prevent overlaps (e.g.,
dev_,staging_,prod_). - Environment Separation: Consider using different environments (
dev,staging,prod) for different connector instances.
Example Resource Isolation:
-
Instance 1: Manages
PROD_DATABASEandPROD_SCHEMA -
Instance 2: Manages
DEV_DATABASEandDEV_SCHEMA
This prevents overlap in resource management and ensures clean policy isolation between instances.
Skip Duplicate Ranger Changelogs
Skip Duplicate Ranger Changelogs
This configuration controls whether the PolicySync connector should skip processing duplicate Ranger changelogs to improve performance and reduce unnecessary processing overhead. When enabled, the connector tracks and skips changelogs that are already queued or being processed, preventing redundant work.
CONNECTOR_RANGER_CHANGELOG_SKIP_DUPLICATE_ENABLE
Default Value: "true"
Description: When enabled, the PolicySync connector will detect and skip duplicate Ranger changelog entries (for policies, roles, tags, GDS info, and user store updates) that are already queued for processing. This optimization prevents the connector from processing the same changelog multiple times, reducing memory usage, improving performance, and speeding up connector restarts by avoiding duplicate changelog reloading.
How it works:
- The connector tracks Ranger changelogs by type and version as they are queued
- If a newer or identical changelog of the same type is already queued, subsequent changelogs are skipped
- This prevents changelog duplication during rapid policy updates or restart scenarios
- Activity logs record when changelogs are skipped for troubleshooting purposes
Performance Impact
Enabling this feature (default) can significantly improve connector performance during high-frequency policy update scenarios and reduce restart times, especially in environments with frequent Ranger policy changes.
When to disable: In rare scenarios where you need to ensure every changelog is processed (for debugging or troubleshooting), you can disable this feature. However, it is recommended to keep this enabled in production environments.
Supported Connectors: This configuration applies to all PolicySync connectors.
Configuration Steps
-
Connect to your Privacera Manager instance via SSH.
-
Edit the connector-specific configuration file:
Bash - Replace
<connector-name>with your connector name (e.g.,snowflake,databricks-sql-analytics,bigquery). - Replace
<instance-name>with your instance name (e.g.,instance1,instance2). - Replace
<TYPE>with your connector name (e.g.,snowflake,databricks.sql.analytics,bigquery).
- Replace
-
Add or update the property:
YAML -
Once the property is configured, run the following commands to update your Privacera Manager platform instance:
Step 1 - Setup which generates the helm charts. This step usually takes few minutes.
Step 2 - Apply the Privacera Manager helm charts. Step 3 - (Optional) Post-installation step which generates Plugin tar ball, updates Route 53 DNS and so on. This step is not required if you are updating only connector properties.
-
In PrivaceraCloud portal, navigate to Settings -> Applications.
-
On the Connected Applications screen, select the desired Application.
-
Click the pen icon or the Account Name to modify the settings.
-
On the Edit Application screen, go to Access Management -> ADVANCED tab.
-
Under Add New Custom Properties, add the following property:
Bash -
Click SAVE to apply the changes.
Attribute-Based Principal Filtering
Attribute-Based Principal Filtering
This configuration enables you to filter roles, groups, and users based on their attributes, allowing you to include or exclude specific principals from being managed by the PolicySync connector. This feature is particularly useful for excluding non-human IAM roles, service accounts, and other automated principals from service role/group/user creation while maintaining full backward compatibility.
Overview
Attribute-based filtering provides fine-grained control over which principals the connector processes by evaluating attribute name-value pairs. You can configure both include filters (to only process principals matching specific attributes) and exclude filters (to exclude principals matching specific attributes).
Filter Evaluation Order
When both include and exclude filters are configured, include filters are evaluated first. Only principals that pass the include filter (if configured) will then be checked against the exclude filter. This ensures that include filters take precedence in the filtering logic.
Key Features
- Flexible Filtering: Supports attribute-based filtering for roles, groups, and users independently.
- Include and Exclude Filters: Configure both include (whitelist) and exclude (blacklist) filters for maximum flexibility.
Configuration Properties
The following properties control attribute-based filtering for roles, groups, and users:
Role Filtering
CONNECTOR_ROLE_INCLUDE_BY_ATTRIBUTE_NAME: Attribute name to use for including roles. Only roles with this attribute will be considered.CONNECTOR_ROLE_INCLUDE_BY_ATTRIBUTE_VALUES: Comma-separated list of attribute values. Roles must have the specified attribute with one of these values to be included.CONNECTOR_ROLE_EXCLUDE_BY_ATTRIBUTE_NAME: Attribute name to use for excluding roles. Roles with this attribute will be excluded.CONNECTOR_ROLE_EXCLUDE_BY_ATTRIBUTE_VALUES: Comma-separated list of attribute values. Roles with the specified attribute matching any of these values will be excluded.
Group Filtering
CONNECTOR_GROUP_INCLUDE_BY_ATTRIBUTE_NAME: Attribute name to use for including groups. Only groups with this attribute will be considered.CONNECTOR_GROUP_INCLUDE_BY_ATTRIBUTE_VALUES: Comma-separated list of attribute values. Groups must have the specified attribute with one of these values to be included.CONNECTOR_GROUP_EXCLUDE_BY_ATTRIBUTE_NAME: Attribute name to use for excluding groups. Groups with this attribute will be excluded.CONNECTOR_GROUP_EXCLUDE_BY_ATTRIBUTE_VALUES: Comma-separated list of attribute values. Groups with the specified attribute matching any of these values will be excluded.
User Filtering
CONNECTOR_USER_INCLUDE_BY_ATTRIBUTE_NAME: Attribute name to use for including users. Only users with this attribute will be considered.CONNECTOR_USER_INCLUDE_BY_ATTRIBUTE_VALUES: Comma-separated list of attribute values. Users must have the specified attribute with one of these values to be included.CONNECTOR_USER_EXCLUDE_BY_ATTRIBUTE_NAME: Attribute name to use for excluding users. Users with this attribute will be excluded.CONNECTOR_USER_EXCLUDE_BY_ATTRIBUTE_VALUES: Comma-separated list of attribute values. Users with the specified attribute matching any of these values will be excluded.
Default Filter Behavior
All filtering properties default to empty strings.
- If a filter property is empty, that filter is not applied.
- Principals are processed normally unless filtered by other configured properties.
Configuration Steps
Choose the method that matches your deployment. Configure only the include/exclude filters you need; leave properties empty or omit them if a filter is not used.
-
In the Self-Managed Portal, navigate to Settings → Applications.
-
On the Connected Applications screen, select the desired Application (connector).
-
Click the pen icon or the Account Name to modify the settings.
-
On the Edit Application screen, go to Access Management → ADVANCED tab.
-
Under Add New Custom Properties, add the attribute-based filtering properties using dot notation. Add only the properties you need; see Configuration Properties for the full list. Example:
-
Click SAVE to apply the changes. Most changes apply immediately without a connector restart when using the Portal.
-
Connect to your Privacera Manager instance via SSH.
-
Edit the connector-specific configuration file:
Bash -
Replace
<connector-name>with your connector name (e.g.,snowflake,databricks-sql-analytics,bigquery). - Replace
<instance-name>with your instance name (e.g.,instance1,instance2). -
Replace
<TYPE>with your connector name (e.g.,snowflake,databricks.sql.analytics,bigquery). -
Add or update the filtering properties as needed (replace
<TYPE>with your connector type, e.g.,SNOWFLAKE,BIGQUERY): -
Once the properties are configured, run the following commands to update your Privacera Manager platform instance:
Step 1 - Setup which generates the helm charts. This step usually takes few minutes.
Step 2 - Apply the Privacera Manager helm charts. Step 3 - (Optional) Post-installation step which generates Plugin tar ball, updates Route 53 DNS and so on. This step is not required if you are updating only connector properties. -
Restart the connector so that the changes take effect. YAML configuration changes require a manual connector restart.
-
In PrivaceraCloud portal, navigate to Settings -> Applications.
-
On the Connected Applications screen, select the desired Application.
-
Click the pen icon or the Account Name to modify the settings.
-
On the Edit Application screen, go to Access Management -> ADVANCED tab.
-
Under Add New Custom Properties, add the following properties:
-
Click SAVE to apply the changes.
Enhanced Policy Evaluation Ordering for Masking and RLF
Enhanced Policy Evaluation Ordering for Masking and RLF
This configuration enables enhanced policy evaluation ordering for Masking and Row Level Filter (RLF) policies, providing a more predictable and configurable evaluation sequence when multiple policies apply to the same resource.
Connector support
This feature is currently supported only for Snowflake and Databricks Unity Catalog.
Overview
When multiple Masking or Row Level Filter policies apply to the same resource, Apache Ranger evaluates them in a specific order to determine which policy takes effect. The enhanced policy ordering feature ensures consistent evaluation based on:
- Tag Policies: Match type (SELF → SELF_AND_ALL_DESCENDANTS → ANCESTOR → DESCENDANT → NONE), then priority, then policy name (alphabetical)
- Resource Policies: Priority, then policy name (alphabetical)
- Public Group Priority: Public group policies have the lowest priority and are only used when no non-public results are available
Configuration Property
Property: ranger.plugin.enhance.policy.ordering.for.masking.and.rlf
Default Value: false
Description: When set to true, enables the enhanced policy evaluation ordering for Masking and Row Level Filter policies.
Detailed Documentation
For complete information about policy evaluation ordering, including detailed ordering rules and examples, see Policy Evaluation Ordering for Masking and Row Level Filtering.
Configuration Steps
-
Connect to your Privacera Manager instance via SSH.
-
Edit the connector-specific configuration file:
Bash -
Replace
<connector-name>with your connector name (e.g.,snowflake,databricks-sql-analytics). - Replace
<instance-name>with your instance name (e.g.,instance1,instance2). -
Replace
<TYPE>with your connector name (e.g.,snowflake,databricks.sql.analytics). -
Add or update the property:
YAML -
Once the property is configured, run the following commands to update your Privacera Manager platform instance:
Step 1 - Setup which generates the helm charts. This step usually takes few minutes.
Step 2 - Apply the Privacera Manager helm charts. Step 3 - (Optional) Post-installation step which generates Plugin tar ball, updates Route 53 DNS and so on. This step is not required if you are updating only connector properties.
-
In PrivaceraCloud portal, navigate to Settings → Applications.
-
On the Connected Applications screen, select the desired Application.
-
Click the pen icon or the Account Name to modify the settings.
-
On the Edit Application screen, go to Access Management → ADVANCED tab.
-
Under Add New Custom Properties, add the following property:
Bash - Click SAVE to apply the changes.
Delete Old Solr Collection Data
Delete Old Solr Collection Data
This script (solr_clean_up.py) deletes audit documents from a single Solr collection, based on date sets.
Permanent data deletion
- This procedure permanently deletes audit documents from the Solr collection you configure. Deleted data cannot be recovered.
- Before you configure, or run anything, verify that
SOLR_URL,SOLR_COLLECTION, and all time boundaries match the intended Solr server and collection.
Prerequisites
- Python 3.8 or later
- Access to the Solr server
- The requests library (installed in the setup steps below)
Download and extract tar file
privacera-solr-audit-clean-up.tar
Setup 1. Download the Solr audit cleanup package:
| Bash | |
|---|---|
| Bash | |
|---|---|
Configuration
Set via environment variables or script defaults.
| Variable | Description | Example |
|---|---|---|
| SOLR_URL | Required. Solr server base URL. No default is provided to avoid accidentally targeting the wrong environment. | https://solr-service.example.com/solr |
| SOLR_USER | Optional. When set, HTTP Basic Auth is used for all Solr requests (e.g. when Solr has basic auth enabled). | solr_admin |
| SOLR_PASSWORD | Optional. Password for Solr basic auth. Use with SOLR_USER. Can be empty if the user has no password. | (secret) |
| SOLR_COLLECTION | Single collection from which audit docs are deleted. Script only touches this collection. | policysync_audit |
| SOLR_MIGRATE_START | Start of the evtTime range. If not set, script uses the min evtTime in the collection. | 2025-11-06T00:00:00Z |
| SOLR_DELETE_BEFORE_DATE | Required. Only docs with evtTime before this date are deleted (exclusive: evtTime equal to this date is not deleted). Set to a time after the latest evtTime you want to remove. No default is provided to avoid accidentally deleting with a wrong boundary. | 2026-03-05T10:00:00Z |
| SOLR_MIGRATE_WINDOW_HOURS | Size of each time chunk in hours (e.g. 2 = 2-hour buckets). Script deletes one chunk at a time to limit load. | 2 |
| SOLR_DELETE_BATCH_SIZE | Within each time chunk, this many doc IDs are fetched and deleted per request (e.g. 1000 = delete 1000, then next 1000). | 1000 |
| SOLR_MIGRATE_STATE_DIR | Directory where progress is written. Used by --resume to continue from the last completed chunk. | .solr_migrate_state |
| SOLR_LOG_FILE | Optional. When set, all log messages are also written to this file (useful for long-running runs or background execution). | ./solr_clean_up.log |
Verify target environment and collection
Confirm every value in the table above—especially SOLR_URL and SOLR_COLLECTION—before running the script. Re-read SOLR_DELETE_BEFORE_DATE and SOLR_MIGRATE_START so the time range matches what you intend to remove. There is no undo after documents are deleted.
Export varibles and Run the Script
Additional Execution Options
Resume a previous run: Use this option if a prior execution was interrupted or failed. The script will continue from where it left off instead of starting over:
| Bash | |
|---|---|
Perform a dry run (no data is deleted): This option executes the cleanup logic without actually deleting any data.
| Bash | |
|---|---|
Step 1 - Setup which generates the helm charts. This step usually takes few minutes.
Step 2 - Apply the Privacera Manager helm charts. Step 3 - (Optional) Post-installation step which generates Plugin tar ball, updates Route 53 DNS and so on. This step is not required if you are updating only connector properties.Asynchronous Solr Audit Log Publishing
Asynchronous Solr Audit Log Publishing
Enables asynchronous publishing of Solr audit logs to prevent blocking PolicySync flows and improve audit ingestion throughput and latency.
- Default:
false - Property:
YAML
Configuration Steps
- In the Self-Managed Portal, navigate to Settings → Applications.
- On the Connected Applications screen, select the desired Application (connector).
- Click the pen icon or the Account Name to modify the settings.
- On the Edit Application screen, go to Access Management → ADVANCED tab.
- Under Add New Custom Properties, add the following property and set it to
true:Bash - Click SAVE to apply the changes.
-
Connect to your Privacera Manager instance via SSH.
-
Edit the connector-specific configuration file:
Bash - Replace
<connector-name>with your connector name (e.g.,lakeformation,snowflake,databricks-sql-analytics). - Replace
<instance-name>with your instance name (e.g.,instance1,instance2). - Replace
<TYPE>with your connector name (e.g.,lakeformation,snowflake,databricks.sql.analytics). - Add or update the property:
YAML -
Once the properties are configured, run the following commands to update your Privacera Manager platform instance:
Step 1 - Setup which generates the helm charts. This step usually takes few minutes.
Step 2 - Apply the Privacera Manager helm charts. Step 3 - (Optional) Post-installation step which generates Plugin tar ball, updates Route 53 DNS and so on. This step is not required if you are updating only connector properties.
- In PrivaceraCloud portal, navigate to Settings -> Applications.
- On the Connected Applications screen, select the desired Application.
- Click the pen icon or the Account Name to modify the settings.
- On the Edit Application screen, go to Access Management -> ADVANCED tab.
- Under Add New Custom Properties, add:
Bash - Click SAVE to apply the changes.
CHANGELOG Completion Audit Size Limits
CHANGELOG Completion Audit Size Limits
When a policy sync finishes, PolicySync writes a CHANGELOG completion audit record to Solr summarizing which policies were part of that run. For very large updates (for example, tens or hundreds of thousands of policies), a single audit document can become too large for Solr to accept.
These settings control how PolicySync splits that completion summary into multiple Solr documents and how large each document may be. They apply to RANGER_POLICIES changelog completions when PolicySync audit publishing to Solr is enabled (solr.policysync.audit.enable=true).
How it works
- When a policy sync finishes, PolicySync writes a completion audit that lists the policies that changed (by ID and version).
- If the update is large, that list is split across several audit records instead of one oversized record.
- Two settings control the split: how many policies go in each audit document, and how large each document may be.
- Every document from the same sync shares the same sync ID, so you can still tell they belong to one job.
Configuration Properties
The following properties control CHANGELOG completion audit size limits:
CHANGELOG Completion Audit Limits
SOLR_POLICYSYNC_AUDIT_CHANGELOG_POLICIES_CHUNK_SIZE: Maximum number of policies listed in one CHANGELOG completion audit record. Default:500. When a sync changes more policies than this limit, the completion audit is split across multiple records.SOLR_POLICYSYNC_AUDIT_CHANGELOG_EXTRAINFO_MAX_BYTES: Maximum size in bytes for one CHANGELOG completion audit record. Default:4096(4 KB). Lower this if Solr rejects large audit payloads after large policy syncs.
When to adjust
Increase chunk size or byte limits only if Solr and your audit pipeline reliably accept larger documents. Decrease them if you see Solr indexing failures or HTTP payload errors after large policy syncs. In most environments the defaults are sufficient.
Configuration Steps
- In the Self-Managed Portal, navigate to Settings → Applications.
- On the Connected Applications screen, select the desired Application (connector).
- Click the pen icon or the Account Name to modify the settings.
- On the Edit Application screen, go to Access Management → ADVANCED tab.
- Under Add New Custom Properties, add or update:
- Click SAVE to apply the changes.
-
Connect to your Privacera Manager instance via SSH.
-
Edit the connector-specific configuration file:
Bash - Replace
<connector-name>with your connector name (e.g.,lakeformation,snowflake,databricks-sql-analytics). - Replace
<instance-name>with your instance name (e.g.,instance1,instance2). - Replace
<TYPE>with your connector name (e.g.,lakeformation,snowflake,databricks.sql.analytics). - Add or update the properties:
-
Once the properties are configured, run the following commands to update your Privacera Manager platform instance:
Step 1 - Setup which generates the helm charts. This step usually takes few minutes.
Step 2 - Apply the Privacera Manager helm charts. Step 3 - (Optional) Post-installation step which generates Plugin tar ball, updates Route 53 DNS and so on. This step is not required if you are updating only connector properties.
- In PrivaceraCloud portal, navigate to Settings -> Applications.
- On the Connected Applications screen, select the desired Application.
- Click the pen icon or the Account Name to modify the settings.
- On the Edit Application screen, go to Access Management -> ADVANCED tab.
- Under Add New Custom Properties, add or update:
- Click SAVE to apply the changes.
Unified Added/Updated Resource Processing
Unified Added/Updated Resource Processing
Processes added and updated resources within a single thread pool executor flow to reduce context switching and overhead.
- Default:
false - Property:
YAML
Configuration Steps
- In the Self-Managed Portal, navigate to Settings → Applications.
- On the Connected Applications screen, select the desired Application (connector).
- Click the pen icon or the Account Name to modify the settings.
- On the Edit Application screen, go to Access Management → ADVANCED tab.
- Under Add New Custom Properties, add:
Bash - Click SAVE to apply the changes.
- Connect to your Privacera Manager instance via SSH.
- Edit the connector-specific configuration file:
Bash - Replace
<connector-name>with your connector name (e.g.,lakeformation,snowflake,databricks-sql-analytics). - Replace
<instance-name>with your instance name (e.g.,instance1,instance2). - Replace
<TYPE>with your connector name (e.g.,lakeformation,snowflake,databricks.sql.analytics). - Add or update the property:
YAML -
Once the properties are configured, run the following commands to update your Privacera Manager platform instance:
Step 1 - Setup which generates the helm charts. This step usually takes few minutes.
Step 2 - Apply the Privacera Manager helm charts. Step 3 - (Optional) Post-installation step which generates Plugin tar ball, updates Route 53 DNS and so on. This step is not required if you are updating only connector properties.
- In PrivaceraCloud portal, navigate to Settings -> Applications.
- On the Connected Applications screen, select the desired Application.
- Click the pen icon or the Account Name to modify the settings.
- On the Edit Application screen, go to Access Management -> ADVANCED tab.
- Under Add New Custom Properties, add:
Bash - Click SAVE to apply the changes.
Enable Synchronization to Service Explorer
Enable Synchronization to Service Explorer
Enables Resource and Permission metadata synchronization to Service Explorer for the connector. To learn more about Service Explorer, refer to Service Explorer.
Configuration Steps
- In the Self-Managed Portal, navigate to Settings → Applications.
- On the Connected Applications screen, select the desired Application (connector).
- Click the pen icon or the Account Name to modify the settings.
- On the Edit Application screen, go to Access Management → ADVANCED tab.
- Under Add New Custom Properties, add:
Bash - Click SAVE to apply the changes.
- Connect to your Privacera Manager instance via SSH.
- Edit the connector-specific configuration file:
Bash - Replace
<connector-name>with your connector name (e.g.,lakeformation,snowflake,databricks-sql-analytics). - Replace
<instance-name>with your instance name (e.g.,instance1,instance2). - Replace
<TYPE>with your connector name (e.g.,lakeformation,snowflake,databricks.sql.analytics). - Add or update the property:
YAML -
Once the properties are configured, run the following commands to update your Privacera Manager platform instance:
Step 1 - Setup which generates the helm charts. This step usually takes few minutes.
Step 2 - Apply the Privacera Manager helm charts. Step 3 - (Optional) Post-installation step which generates Plugin tar ball, updates Route 53 DNS and so on. This step is not required if you are updating only connector properties.
- In PrivaceraCloud portal, navigate to Settings -> Applications.
- On the Connected Applications screen, select the desired Application.
- Click the pen icon or the Account Name to modify the settings.
- On the Edit Application screen, go to Access Management -> ADVANCED tab.
- Under Add New Custom Properties, add:
Bash - Click SAVE to apply the changes.
- Prev topic: Connector Deployment
- Next topic: Managing PolicySync Configurations