Ranger Tag and Omni Tag-Based Masking in BigQuery
This guide explains how to configure and use Ranger tag-based and Omni tag-based masking in the BigQuery Connector. It applies to Ranger-managed tags and Omni tags (not service tags), where Privacera/Ranger serves as the single source of truth.
Alternative Approach
This document explains Ranger Tag and Omni Tag-Based Masking. If you prefer to use BigQuery's native service tags, see Native Tag Masking in BigQuery for details on the alternative approach.
BigQuery supports two approaches for tag-based masking:
-
Service Tags: Tags are created and managed directly in BigQuery and automatically synchronized with Privacera. This approach requires manual configuration in BigQuery and offers limited flexibility compared to Ranger-managed tags.
-
Ranger Tags or Omni Tags: Tags are created and managed entirely within Privacera (via Ranger Tag Management or Omni Governance Hub). The connector automatically handles BigQuery policy tag creation, taxonomy management, and column associations. This approach provides full control and eliminates the need for manual configuration in BigQuery.
Overview
Introduction
Ranger and Omni tag-based masking with Privacera allows administrators to define and manage tags directly in Privacera, while the connector automatically synchronizes them with BigQuery. This ensures that Privacera/Ranger remains the single source of truth for masking and access control policies, providing centralized governance and consistency.
Key benefits:
- Maintain full control over tag definitions in Privacera.
- Automatically create BigQuery policy tags, taxonomy, and column associations.
- Simplify management by eliminating manual setup in BigQuery.
Comparison: Service Tags vs. Ranger Tags vs. Omni Tags
| Feature | Service Tags | Ranger Tags | Omni Tags |
|---|---|---|---|
| Source of Truth | BigQuery (tags synchronized from BigQuery) | Privacera/Ranger (tags created in Privacera) | Privacera/Omni (tags created in Privacera Governance Hub) |
| Tag Management | Read-only, synchronized from BigQuery | Full control within Privacera (Tag Management) | Full control within Privacera (Governance Hub — Tags and Metadata) |
| Policy Tag Creation | Manual in BigQuery | Connector creates policy tags and column associations automatically | Connector creates policy tags and column associations automatically |
| Tag Attributes | Limited to BigQuery taxonomy | Custom attributes (e.g., taxonomyId, project) | Custom attributes (e.g., taxonomyid, project) |
| Configuration | USE_SERVICE_TAGS=true | USE_SERVICE_TAGS=false | USE_SERVICE_TAGS=false (and Omni enabled) |
| Policy Flexibility | Based on BigQuery taxonomy hierarchy | Flexible, custom tag definitions | Flexible, custom tag definitions |
Configuration Requirements
By default, the BigQuery connector is configured to use service tags (USE_SERVICE_TAGS=true). To enable Ranger tag-based masking or Omni tag-based masking, you must disable service tags by setting USE_SERVICE_TAGS=false. The exact configuration steps depend on your deployment type.
Important
Ensure service tags are properly disabled. If not, you may encounter policy conflicts or unexpected behavior.
Using Omni Tags
To use Omni tag-based masking, enable and configure Omni as described in Omni Configuration.
Configuration Steps
- In the Self-Managed Portal, navigate to Settings → Applications.
- On the Connected Applications screen, select BigQuery.
- Edit the application (click the pen icon or Account Name).
- Navigate to Access Management → ADVANCED tab.
- Add the following property under Add New Custom Properties:
-
Click SAVE.
Configuration Update
The connector will automatically restart after saving the application configuration.
- SSH to the instance where Privacera Manager is installed.
-
Open the connector configuration file:
Bashvi ~/privacera/privacera-manager/config/custom-vars/connectors/bigquery/instance1/vars.connector.bigquery.ymlNote
If you have multiple connectors, then replace
instance1with the appropriate connector instance name. -
Add or update the property:
- Once the property have been configured, execute the following commands to update your Privacera Manager platform instance:
- In PrivaceraCloud portal, navigate to Settings → Applications.
- On the Connected Applications screen, select BigQuery.
- Edit the application (click the pen icon or Account Name).
- Navigate to Access Management → ADVANCED tab.
- Add the following property under Add New Custom Properties:
-
Click SAVE.
Configuration Update
The connector will automatically restart after saving the application configuration.
Prerequisites
- BigQuery connector installed and running.
- Service tags disabled (
USE_SERVICE_TAGS=false). See Configuration Requirements for setup instructions. - Row filter and masking setup completed Native Row Filter and Tag Masking Setup.
- BigQuery Policy Tag Taxonomy: A policy tag taxonomy must exist in BigQuery before creating Ranger or Omni tags. The connector will create policy tags within this taxonomy automatically, but the taxonomy itself must be pre-created in BigQuery.
Tag Naming Requirements
When creating Ranger or Omni tags for BigQuery, follow these naming conventions:
- Tag names must be unique within your Privacera environment
- Use descriptive names that clearly identify the purpose (e.g.,
customer_pii_tag,financial_data_tag) - Avoid special characters that might cause issues with BigQuery policy tag creation
- Consider including project context in the name for better organization (e.g.,
project_name_data_type_tag)
Sample Names
The examples in this guide use sample names like forward_camera_182345_priv_tag_id for demonstration purposes. Use meaningful names that reflect your actual data classification needs.
Required Fields for BigQuery Tag Creation
When creating Ranger or Omni tags for BigQuery, you must configure the following required fields:
| Field | Type | Description | Example | Source | Required for |
|---|---|---|---|---|---|
| Tag Name | String | Unique identifier for the tag in Privacera | customer_pii_tag | User-defined | Ranger & Omni |
| taxonomyId | Integer | BigQuery policy tag taxonomy ID where the tag will be created | 12345678 | From BigQuery Console | Ranger & Omni |
| project | String | BigQuery project name where the taxonomy exists | my-gcp-project | From BigQuery Console | Ranger & Omni |
| Service | String | Privacera service name for BigQuery | privacera_bigquery | Fixed value | Ranger only |
| Resource Type | String | Type of BigQuery resource being tagged | column, table, dataset | User-selected | Ranger only |
| Resource Values | String | Specific resource identifiers | project.dataset.table.column | User-defined | Ranger only |
Ranger vs Omni
Service, Resource Type, and Resource Values are required only for Ranger tags. Omni tags use the Data Catalog and tag-to-resource flow instead; the connector still requires Tag Name, taxonomyId, and project for both.
Use Cases
Applying Ranger Tag or Omni Tag-Based Masking Policy for End User
This guide outlines the steps to create Ranger tag-based or Omni tag-based masking policies in Privacera using Ranger tags or Omni tags with custom attributes.
Scenario
- Project:
forward-camera-182345- Dataset:
test_db- Table:
test_data- Policy Tag Taxonomy ID:
12345678(sample ID - see Required Fields for details)- Tag Name:
forward_camera_182345_priv_tag_id(sample name)- Users:
test_user1(masked access),test_user2(unmasked access)
Step 1: Create Tag Definition
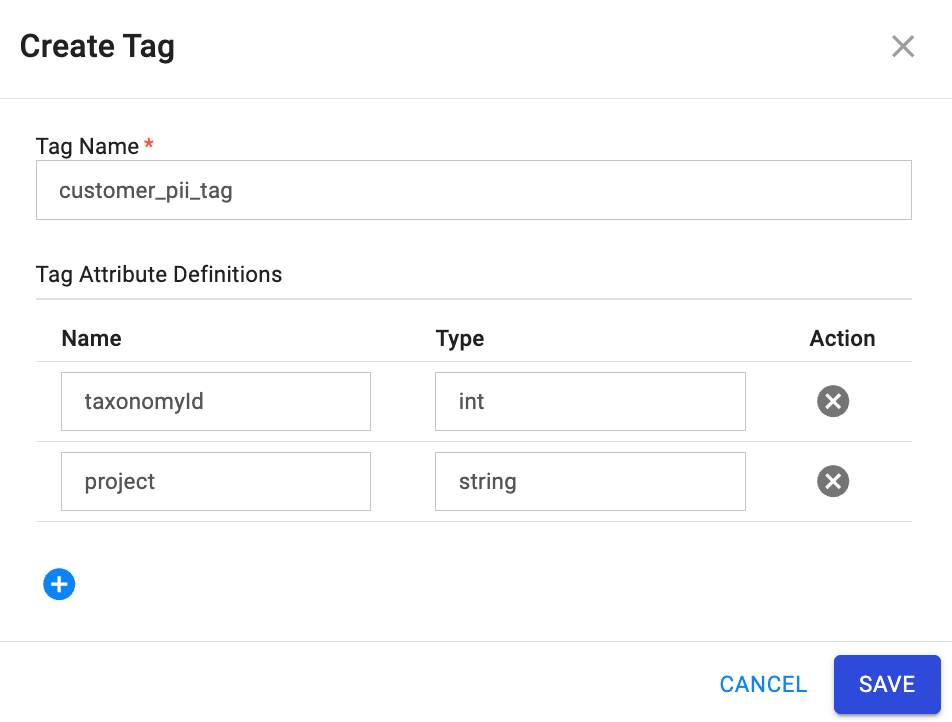
- In Privacera Portal, navigate to Access Management → Tag Management then click Create Tag.
- Configure the tag:
- Tag Name:
forward_camera_182345_priv_tag_id - Add Tag Attribute Definitions:
taxonomyId(int): BigQuery policy tag taxonomy ID where the policy tag will be created. This must be a valid taxonomy ID from your BigQuery project.project(string): BigQuery project name where the taxonomy exists. This should match the project where your BigQuery connector is configured.
- Tag Name:
- Click SAVE.
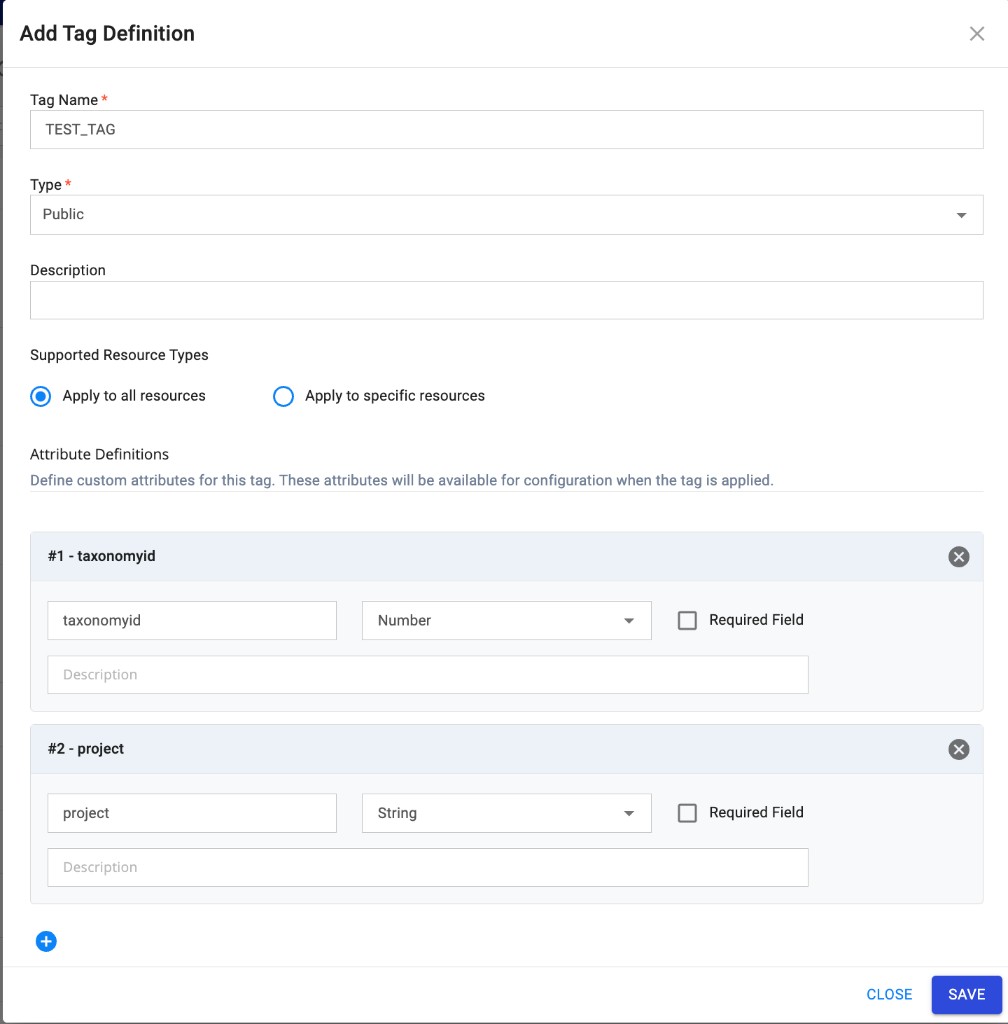
- In the Governance Hub, navigate to Tags and Metadata → Add Tag.
- In the Add Tag Definition dialog, configure the tag:
- Tag Name: Enter a unique name (e.g.,
TEST_TAG). - Type: Select the tag type (e.g., Public).
- Description: Optionally add a description.
- Supported Resource Types: Choose Apply to all resources or Apply to specific resources.
- Tag Name: Enter a unique name (e.g.,
- Under Attribute Definitions, add the required custom attributes:
- Attribute 1: Name
taxonomyid(lowercase), Type: Number. This is the BigQuery policy tag taxonomy ID where the policy tag will be created. - Attribute 2: Name
project, Type: String. This is the BigQuery project name where the taxonomy exists.
- Attribute 1: Name
- Click SAVE.
Omni Tag attribute naming
For Omni Tags, the taxonomy attribute must be defined as taxonomyid (all lowercase) with type Number.
Tag name length
Tag name length is limited to 100 characters for Omni Tags.
Step 2: Create Tag Resource Mapping
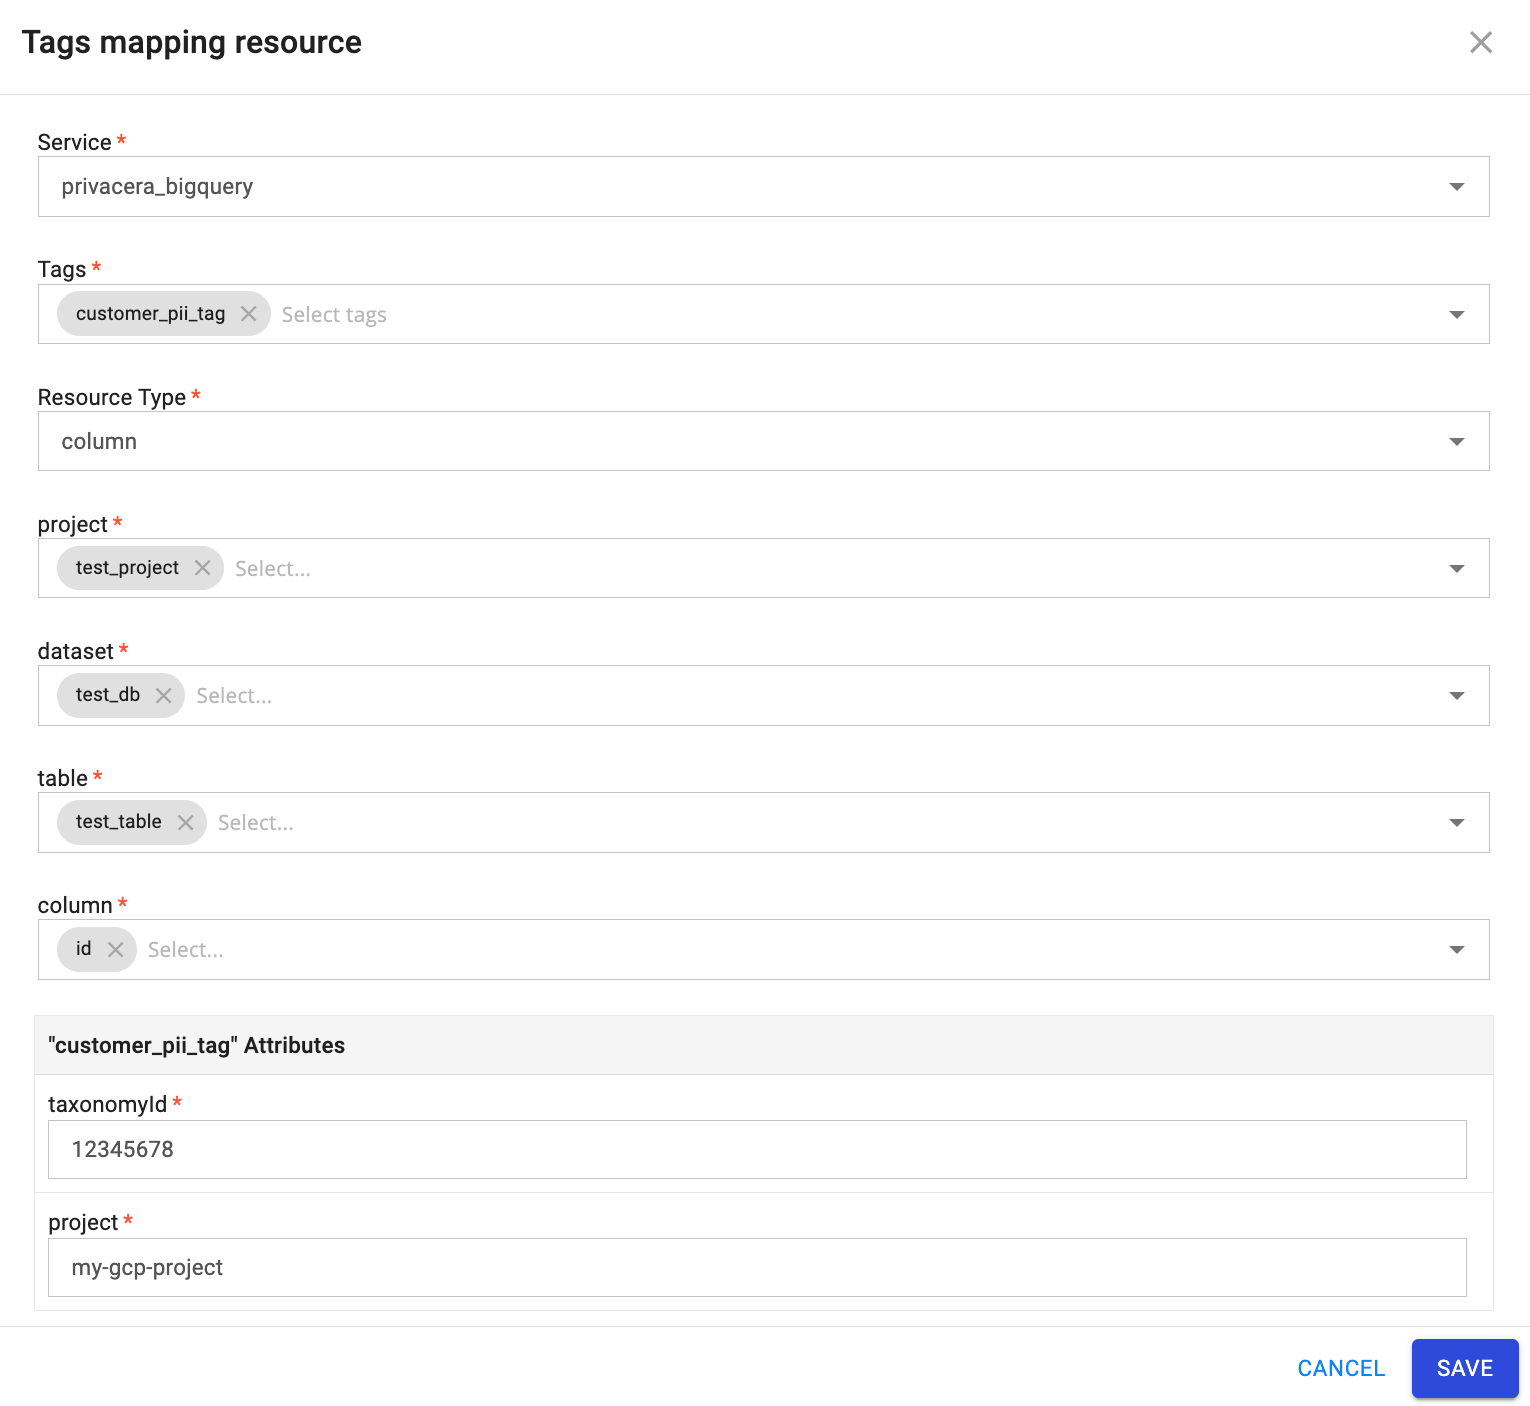
- In Tag Management, go to RANGER TAGGED RESOURCES → Tag Resource.
-
- Service:
privacera_bigquery - Tag:
forward_camera_182345_priv_tag_id - Resource Type: Select the appropriate resource type, then specify values for project, dataset, table, and column.
- taxonomyId:
12345678(must match the taxonomyId from Step 1) - project:
forward-camera-182345(must match the project from Step 1)
Configure the following settings:
Note
Ensure that both
taxonomyIdandprojectvalues match those defined in Step 1 and correspond to the same project location where the BigQuery connector is configured. The connector will create policy tags under the specified taxonomy in the specified project. - Service:
-
Click SAVE.
- In the Governance Hub, go to Data Catalog.
- Select the service from the top-left corner, then select the table that needs to be tagged.
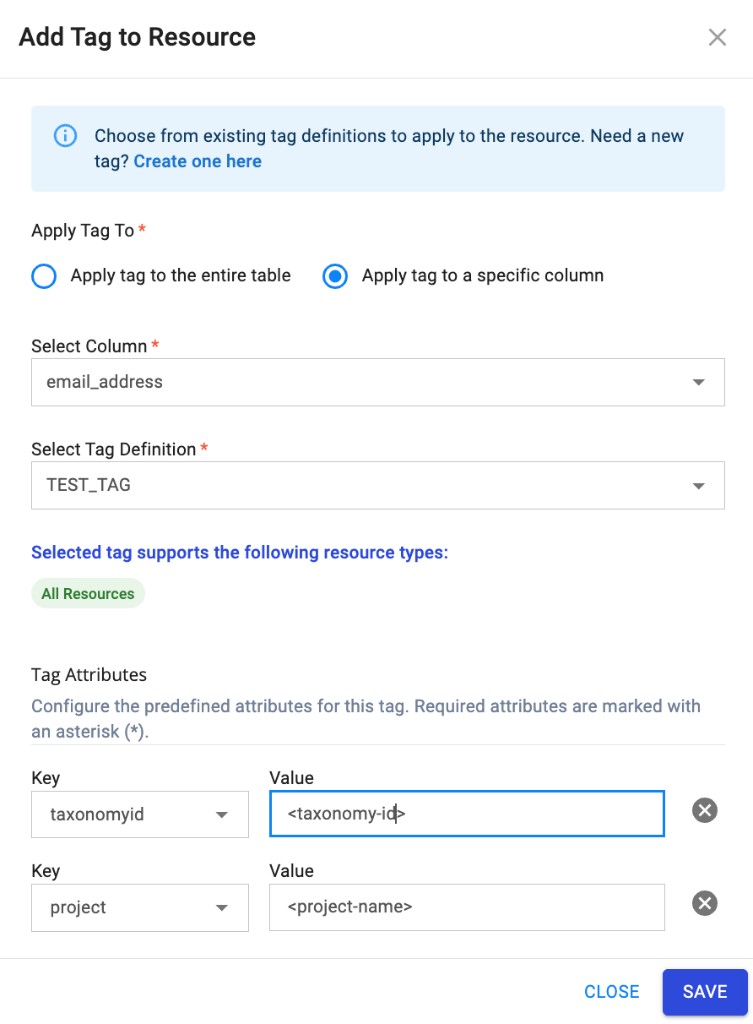
- Click Tags → Add.
- In the Add Tag to Resource dialog:
- Apply tag to: Select Apply tag to a specific column.
- Select Column: Choose the column from the dropdown (e.g.,
email_address). - Select Tag Definition: Choose the tag from the dropdown (e.g.,
TEST_TAG).
- Under Tag Attributes, configure the predefined attributes for this tag:
- taxonomyid: Enter the taxonomy ID value (e.g.,
<taxonomy-id>). Required attributes are marked with an asterisk (*). - project: Enter the project name (e.g.,
<project-name>).
- taxonomyid: Enter the taxonomy ID value (e.g.,
- Click SAVE.
Tag attributes
The tag attributes (e.g., taxonomyid, project) correspond to the attribute definitions created in Step 1. Use the same values as required for the BigQuery connector (taxonomy ID and project where the taxonomy exists).
After Mapping
Once a tag is mapped to a column, users cannot query that specific tagged column unless one of the following policies is configured:
- Tag-Based Masking Policy: Grants masked access to the tagged column (users can query the table but see obfuscated values for the tagged column).
- Tag-Based Access Policy: Grants unmasked/full access to the tagged column (users can query the table and see original values for the tagged column).
Policy Requirements for Tagged Columns
- For tagged columns: You must use either a Tag-Based Masking Policy or Tag-Based Access Policy
- For table access: Resource-Based Access Policies are still required for general table access (SELECT, etc.)
- Combined approach: You need both Resource-Based Policies (for table access) AND Tag-Based Policies (for tagged column access)
Tip
Without either a tag-based masking policy or a tag-based access policy, users will receive access denied errors when attempting to query tables with tagged columns, even if they have resource-based access to the table.
Step 3: Create Resource-Based Access Policies
Job Creation Policy
- Login to Privacera Portal.
- Navigate to Access Management → Resource Policies → BigQuery connector.
- Under Access tab, click on ADD NEW POLICY.
- Create Resource-Based Policy:
- Policy Type: Access Policy
- Policy Name: Provide name for the access policy e.g.
Job Create for Users. - Project ID: Provide project id e.g.
forward-camera-182345. - Dataset Name: Select as
none. - Select User: Assign appropriate users e.g.
test_user1,test_user2. - Permissions: Provide
Job Createpermission.
- Click SAVE.
Query Access Policy
Create another resource-based policy for Query permission on table resource.
- Policy Type: Access Policy
- Policy Name: Provide name for the access policy e.g.
Table Level Select. - Project ID: Provide project name e.g.
forward-camera-182345 - Dataset Name:
test_db - Table Name:
customer_data - Select User: Assign appropriate users e.g.
test_user1,test_user2. - Permissions: Provide
Querypermission. - Click SAVE.
Step 4: Create Tag-Based Masking Policy
- In Privacera Portal, navigate to Access Management → Tag Policies →
privacera_tag. - Under MASKING tab, click ADD NEW POLICY.
- Configure masking policy:
- Policy Type: Masking
- Policy Name: Provide name for the masking policy e.g.
Tag based masking policy. - TAG: Select required tag from the drop-down e.g.
forward_camera_182345_priv_tag_id. - Select User: Assign appropriate user e.g.
test_user1. - Component Permissions:
bigquery - Select Masking Option: Select desired masking option e.g.
Nullify.
- Click SAVE.
Step 5: Create Tag-Based Access Policy
Create another tag-based access policy for Query permission.
- In Tag Policies, under ACCESS tab, click ADD NEW POLICY.
- Configure access policy:
- Policy Type: Tag-Based Access Policy
- Policy Name: Provide name for the access policy e.g.
Tag based column access policy. - Tag:
forward_camera_182345_priv_tag_id - Select User: Assign appropriate user e.g.
test_user2. - Component Permissions: Select component as
bigqueryand permissions asquery.
- Click SAVE.
Tag Resource Mapping Behavior
When you map the same Ranger tag to resources across different BigQuery taxonomies, the connector automatically applies policies to all associated policy tags.
Multi-Taxonomy Support
If a single Ranger tag is mapped to columns in different taxonomies (different taxonomyId values), the following behavior applies:
- Masking Policies: Tag-based masking policies are automatically applied to all policy tags across all taxonomies where the tag is mapped.
- Fine-Grained Reader Role: Tag-based access policies (fine-grained reader role) are automatically applied to all policy tags across all taxonomies.
Example Scenario
Consider a tag named customer_pii_tag mapped to the following resources:
- Column
customer_namein Taxonomy A (taxonomyId: 12345678) - Column
customer_emailin Taxonomy B (taxonomyId: 87654321)
When you create a masking policy for customer_pii_tag, the connector automatically applies the policy to the corresponding policy tags in both Taxonomy A and Taxonomy B. Similarly, fine-grained reader role grants are applied to all policy tags associated with this tag.
Policy Application Behavior
When you update tag resource mapping for existing tags, the connector automatically applies masking and access policies to the new or changed mappings. If policies are already enabled, they are automatically applied once the tag resource mapping update is successfully completed.
This ensures consistent policy enforcement across all taxonomies where the tag is used, simplifying management and maintaining security posture.
Updating Tag Resource Mapping with New Taxonomy ID
When the same tag name is attached to multiple table columns and the tag resource mapping is updated with a new taxonomy ID, the tag will have multiple taxonomy IDs. The policy application behavior depends on the policy types configured:
-
Tag Masking + Tag Access Policy: When both tag-based masking and tag-based access policies are applied to the tag, policies are automatically applied to the new taxonomy ID. Both masking and access permissions are synchronized across all taxonomy IDs.
-
Tag Masking Only: When only tag-based masking policy is enabled, the masking policy is automatically applied to the new taxonomy ID. Masking permissions are synchronized across all taxonomy IDs.
-
Tag Access Policy Only: When only tag-based access policy is enabled, policies are not automatically applied to the new taxonomy ID. Manual intervention is required—you can enable or disable the policy manually to apply access policies to the new taxonomy ID.
Tag Access Policy Limitation
For tag-based access policies, if a tag is mapped to a new taxonomy ID, you must manually enable or disable the policy to apply access policies to that new taxonomy ID. The connector does not automatically propagate access-only policies to newly mapped taxonomy IDs.
Initial Setup Sequence for Policy Application:
- Create the tag and tag resource mapping.
- Wait for the tag and mapping creation to complete successfully.
- Create or apply policies (masking and access policies).
 Limitations
-
Access Denied After Tag Resource Mapping:
-
Users cannot query tagged columns unless they are explicitly granted access through a tag-based masking policy or a tag-based access policy for the specific tag.
Note
Tag-based policies control access to the tagged column specifically, not the table itself. Without either tag-based policy, all users will receive access denied errors when querying tables with tagged columns, even if they have resource-based access to the table.
-
Refer BigQuery Column-Level Security for more details.
-
-
Service Tags Compatibility:
- Ranger and Omni tag-based masking and service tags cannot be used together.
- Ensure
USE_SERVICE_TAGS=falseis configured. - Switching between Service tags and Ranger/Omni tags requires connector restart.
-
Tag Attribute Management:
- Custom tag attributes like
taxonomyIdandprojectmust be accurate. - Incorrect values may cause policy sync failures.
- Custom tag attributes like
-
Location Support in Connector's Configuration:
- BigQuery resources and taxonomies can be created across various locations. However, the PolicySync connector currently supports access control management for resources within a single location.
- The connector does not support the management of resources across multiple locations concurrently.
- Ensure that your BigQuery taxonomy and all resources you want to tag are in the same location as your connector configuration.
- Prev Connector Guide