Tag-Based Masking and Unmasking
This page explains how tag-based masking and unmasking work for Microsoft SQL Server when you use Apache Ranger tags with Privacera PolicySync. It covers both service definitions used by the connector:
mssql— the default service definition, used for Azure SQL Database, Azure SQL Managed Instance, Azure Synapse Analytics, and SQL Server 2022 and later.privacera_mssql_19— the service definition used for SQL Server 2019 and earlier.
The masking types (Credit Card, Custom, Datetime, Default, Email, Nullify, and Random Number) and the masking and unmasking scope for each version are described in Native Masking and Unmasking Types. Datetime is available only with the mssql service definition; see What differs by deployment. This page focuses on how the same behavior is driven by tags instead of by naming each column directly.
Behavior across SQL Server deployments
The connector supports SQL Server on-premises, Azure SQL Database, Azure SQL Managed Instance, and Azure Synapse Analytics. Masking works the same way on all of them. What changes is the unmasking scope and, on SQL Server 2019 and earlier, the set of masking types you can choose from.
What is the same everywhere
Masking is always applied to the column. With native enforcement, the connector masks a tagged column using the native SQL Server dynamic data masking functions, so a given masking type produces the same masked value on every deployment. Masking also stays non-user-specific everywhere, and when native masking is enabled the policy must use public in the user, group, or role input. The unmasking scope and the available masking types differ by deployment, as described below.
What differs by deployment
Unmasking scope depends on how precisely the target engine can grant the unmask privilege, and that is what decides which service definition you use:
- Azure SQL Database, Azure SQL Managed Instance, Azure Synapse Analytics, and on-premises SQL Server 2022 and later can grant unmasking on a single column. These use the
mssqlservice definition, so a tag-based unmasking grant returns the real value only for the tagged columns. - On-premises SQL Server 2019 and earlier can grant unmasking only for an entire database. These use the
privacera_mssql_19service definition, so a tag-based unmasking grant covers every masked column in that database, not only the tagged ones. Set the schema to None when you create the grant.
The masking types also differ slightly between the two service definitions. The mssql service definition offers Datetime masking in addition to Default, Nullify, Unmasked, Custom, Email, Credit Card, and Random Number. The privacera_mssql_19 service definition does not offer Datetime, so that masking type is unavailable on SQL Server 2019 and earlier. With native enforcement, the connector applies the SQL Server default() mask for a Datetime policy.
Warning
The privacera_mssql_19 service definition still lets you select a schema, table, and column in an unmasking policy. If you grant unmasking at the column level on SQL Server 2019 or earlier, the connector sends a column-level unmask statement that the database rejects, and the grant does not take effect. Always grant unmasking at the database level on those versions.
The mssql service definition is the default. For SQL Server 2019 and earlier, set CONNECTOR_MSSQL_RANGER_SERVICE_NAME to privacera_mssql_19 in vars.connector.mssql.yml on Self-Managed, or add the equivalent custom PolicySync property on PrivaceraCloud, as described in Ranger service definition.
What tag-based masking and unmasking means
With resource-based policies, you name each database, schema, table, or column in the policy. With tag-based policies, you attach a tag (for example PII) to the columns once, and then write a policy against that tag. Any column that carries the tag is protected, so you do not have to update the policy every time a new tagged column appears.
- Tag-based masking hides the value of every tagged column from users who are not allowed to see the real data.
- Tag-based unmasking (also called a tag-based access grant) lets specific users, groups, or roles see the original, unmasked value of those same tagged columns.
How it works end to end
Tag-based enforcement for Microsoft SQL Server follows the standard PolicySync flow. For the underlying design, see Tags in PolicySync.
- You create a tag definition in Privacera (for example
PII). - You attach that tag to the columns you want to protect (for example the
ssncolumn of a table). - You create a tag-based masking policy and, optionally, a tag-based unmasking (access) policy against that tag.
The connector enforces the tag-based policy using whichever mode is enabled:
- Native enforcement, when native masking is turned on. See Enable Native Support.
- Secure view enforcement, which is the default. See Enable Secure View.
Creating and attaching tags
Before you can write a tag-based policy, the tag must exist and must be attached to the Microsoft SQL Server resources you want to protect. The steps differ depending on whether OMNI is enabled, so follow the flow that matches your deployment.
With OMNI enabled
When OMNI is enabled, you create the tag under Settings and attach it from the Data Catalog.
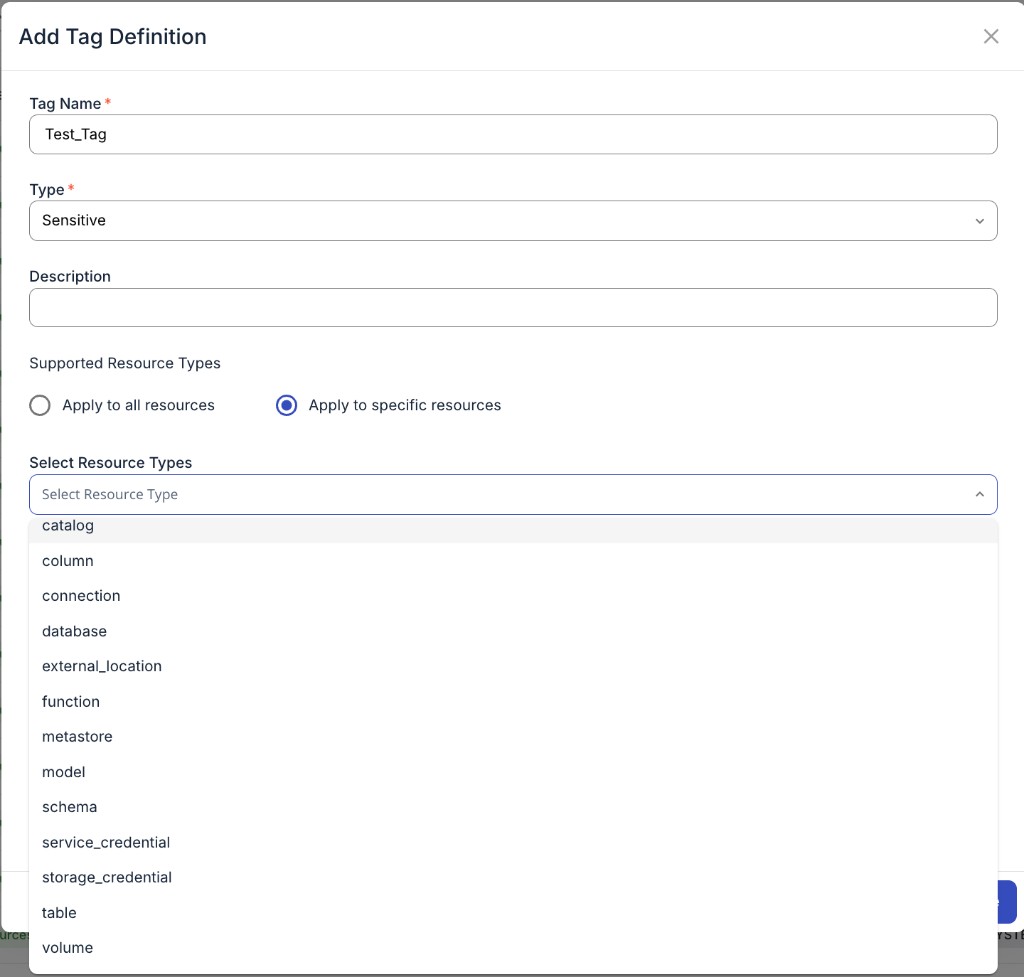
Step 1: Create the tag definition
- Go to Settings → Tags and Metadata.
- Select Add Tag. The Add Tag Definition popup opens.
- Enter the Tag Name (for example
PII). - Select the Type from the Select Tag Type dropdown. Available types are Sensitive, Confidential, Internal, and Public.
- Optionally, enter a Description.
- Under Supported Resource Types, choose one of the following:
- Apply to all resources to allow the tag on any resource type.
- Apply to specific resources to restrict the tag to selected resource types. For Microsoft SQL Server, the applicable resource types are database, schema, table, and column.
- Optionally, add Attribute Definitions by entering an Attribute Name, choosing a type from the Select Type dropdown, and marking Required Field if needed.
- Select Save.
Step 2: Attach the tag to a resource
- Go to Data Browser → Data Catalog.
- Select the service for your connector (for example
privacera_mssqlorprivacera_mssql_19). - Expand the tree and select the resource you want to tag (database, schema, or table).
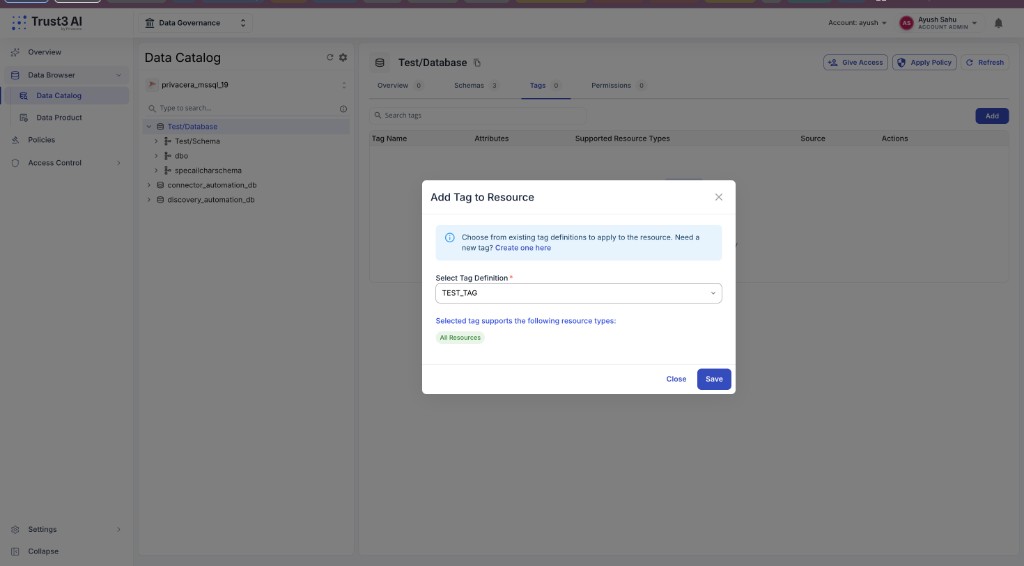
- Open the Tags tab for that resource and select Add. The Add Tag to Resource popup opens.
- Under Apply Tag To, choose Apply tag to the entire table or Apply tag to a specific column.
- Use Select Tag Definition to search for and select the tag you created (for example
PII). - Select Save.
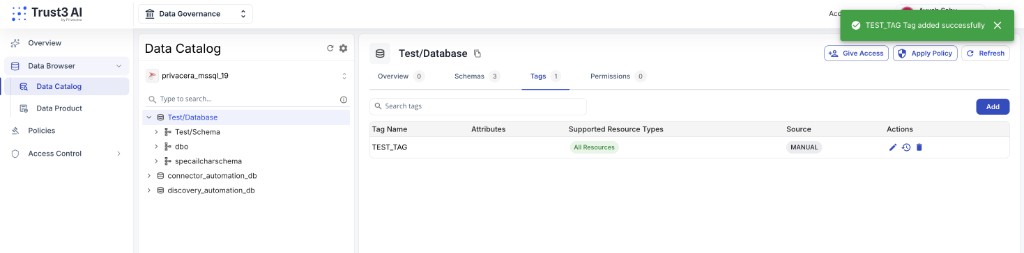
Once the tag is attached, it appears in the Tags tab of the resource.
Without OMNI
When OMNI is not enabled, you create the tag and attach it to resources from the same Tag Management screen.
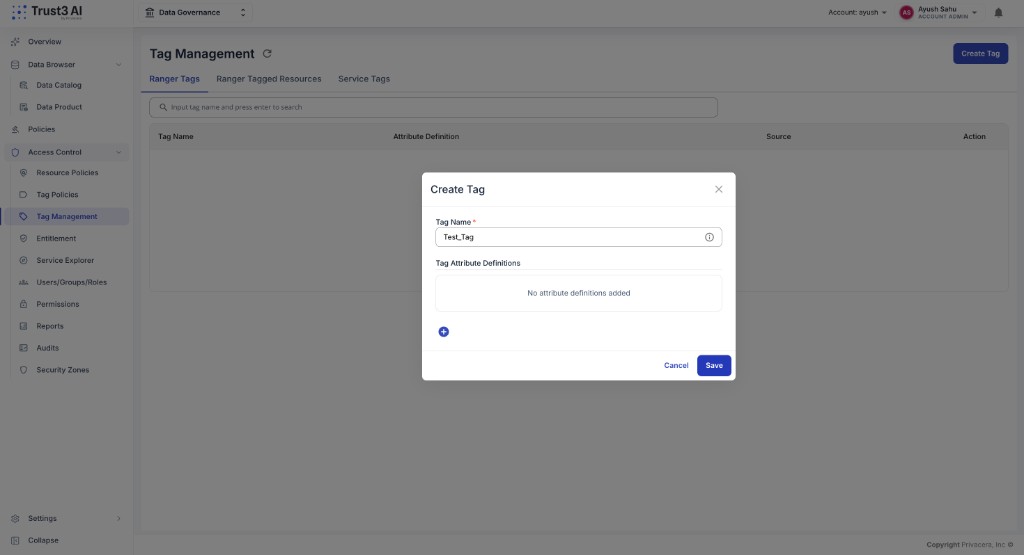
Step 1: Create the tag definition
- Go to Access Control → Tag Management.
- On the Ranger Tags tab, select Create Tag. The Create Tag popup opens.
- Enter the Tag Name (for example
PII). - Optionally, under Tag Attribute Definitions, select the add icon and enter the attribute name and type.
- Select Save.
Step 2: Attach the tag to a resource
- Go to Access Control → Tag Management.
- Select the Ranger Tagged Resources tab.
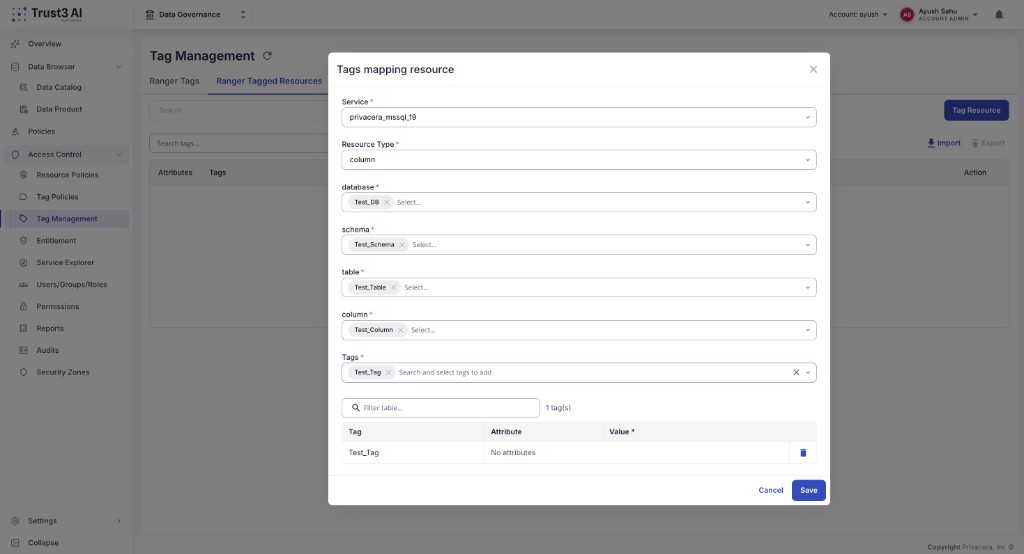
- Select Tag Resource. The Tags mapping resource popup opens.
- Select the Service for your connector (for example
privacera_mssqlorprivacera_mssql_19). - Select the Resource Type. For Microsoft SQL Server, choose database, schema, table, or column.
- Enter the resource names for the selected hierarchy (such as database, schema, table, and column).
- Select the Tags you want to apply (for example
PII). - Select Save.
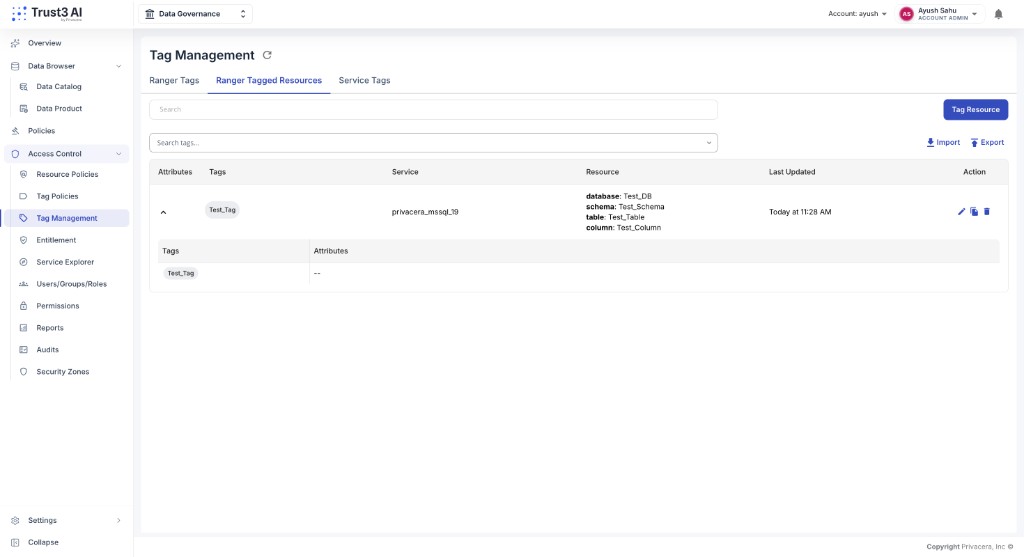
Once the tag is attached, the tagged resource is listed with its service, resource hierarchy, and tags.
Using Microsoft Purview tags
Instead of creating tags manually, you can synchronize tags and classifications from Microsoft Purview. Once the sync runs, the Purview tags appear in the Privacera UI and can be used in tag-based masking and unmasking policies just like tags you create yourself.
Where the synced tags appear depends on whether OMNI is enabled:
- If OMNI is enabled, the Purview tags are visible under Settings → Tags and Metadata.
- If OMNI is not enabled, the Purview tags are visible in the Ranger tag management screen under Access Control → Tag Management.
After the tags are visible, create tag-based policies against them the same way as for any other tag. To enable the Purview tag sync, see Microsoft Purview tag sync.
For more on managing tags, see Tag Management.
Tag-based masking
Tag-based masking applies the same mask to every user who does not have unmasking access, for every column that carries the tag.
- Masking is not user-specific. For a given tagged column, the same mask is shown to all non-privileged users.
- When native masking is enabled, the masking policy must use
publicin the user, group, or role input. If you enter any other principal, the policy throws an error and masking does not take effect. This is the same rule as resource-based native masking. - The mask value depends on the masking type you choose and the column data type, as listed in Native Masking and Unmasking Types. For Datetime, see What differs by deployment.
To create the policy:
- Go to Access Control → Tag Policies and start creating a masking policy.
- Select the tag (for example
PII). - Choose the masking type (for example Nullify).
- Enter
publicin the user, group, or role input when native masking is enabled. - Select Save to create the policy.
Tag-based unmasking
Tag-based unmasking grants chosen principals the right to see the real value of the tagged columns. You grant it to specific users, groups, or roles, and the scope of that grant depends on the service definition.
With the mssql service definition
This applies to Azure SQL Database, Azure SQL Managed Instance, Azure Synapse Analytics, and SQL Server 2022 and later. Unmasking is supported at the column level, so a tag-based unmasking grant returns the real value only for the tagged columns, for the principals you list.
With the privacera_mssql_19 service definition
This applies to on-premises SQL Server 2019 and earlier. Unmasking is supported only at the database level. A tag-based unmasking grant is therefore effective at the database scope rather than per column. In the Privacera UI you set the schema to None and grant unmasking to the user, group, or role at the database level.
For the version-by-version details and the reasoning behind these scopes, see Native Masking and Unmasking Types.
- Prev topic: Advanced Configuration